
To improve art skills, learn about the essential techniques for your chosen medium, how to mix colours and of course, practice more frequently. It’s completely natural to make lots of progress in a particular skill, then feel like you are coming to a plateau.
There are certain exercises you can try, to get out of a stand still and to make you feel like you are progressing once more.
Disclaimer: Fine Art Tutorials is a reader supported site. When you make purchases through links on this site, we may earn a small commission at no extra cost to you.
Practice to improve art skills

When improving any skill, the best thing to do to improve faster is practice. Commit to putting aside a certain amount of time per day, or every other day, depending on what you can fit into your routine.
Even if you are primarily learning oil painting, which is perhaps the most time consuming medium to learn, setting aside 20 minutes per day to fit in a drawing practice will help your painting skills develop. Learning to draw can improve skills in any other medium, as it improves accuracy in rendering the structure and proportions of a piece. It also helps artists develop their skills at portraying accurate value transitions (highlights and shadows).
Then if you have time to commit to an hour or two painting at the weekend, you will see your skills improve rapidly. It helps to read up on some of the essential techniques and fully understand your medium to guide your practice.
Avoid beginner mistakes
There are multiple common mistakes that beginner painters make when they first start out. The first is not being able to determine values properly, and mixing colours that are either too saturated or contrasted. Avoid using pure titanium white in a painting, as most highlights in life settings are a tone of another colour. Make sure to neutralise colours either with a complementary colour or with burnt umber to tone it down to make it look realistic. If you’re a visual learner, check out our guide showcasing the best painting video tutorials for artists.
Plan the composition first
Planning a painting or drawing properly before committing to applying colour marks can save you from making mistakes. It will also help you to make your painting as aesthetically pleasing as possible.
Planning the composition involves deciding where the main subject and other elements will go before you start. You could start with a few thumbnail sketches or a composition sketch mock-up. Make a few iterations, move things around and play with colour schemes to ensure you are achieving the intended effect. Decide whether you want to achieve a sense of drama, or harmony.
There are a number of compositional techniques you can use to arrange the main subjects and elements of your artwork to achieve the intended effect. For example, create a focal point of the painting by arranging elements geometrically using the rule of thirds. Another tactic, which is especially useful when working from a photo reference is to simplify the image. By simplifying, the main focus of the painting will stand out more.

You could even try some fun techniques, like framing the main subject of the painting. This works well in landscapes. Monet used this technique in his painting, where he framed the boats and water with foreground leaves.
By carefully planning your composition, you will get the most out of each painting. Plus, making small sketches of the painting before you start gives you practice in sketching out proportions, which is often something beginner artists struggle with. If the proportions in an artwork aren’t right, the whole piece will look off balance. Artists of all levels plan compositions before starting, it’s an essential step of the process for professional artists when preparing to create art to sell.
Learn how to mix colours accurately

When painting, or drawing with colouring pencils, learning how different pigments combine to make new colour mixes will accelerate your skills quickly.
The first step in learning to mix colours is in choosing the right colour palette. Choose a palette that enables you to mix a large range of values and colours. For example, if you choose pigments that closely correspond to primary colours, which will be primary red, primary blue and yellow, you will be able to mix a full chromatic range.
In pigment form, the colours that closely correspond to primaries are: primary red or magenta (pigment code PV19), primary blue, phthalocyanine or cyan (PB15) and primary yellow (PY128). Artists often add warm or cool versions of each primary to add variety to the palette. An example may be to add ultramarine blue, which leans towards purple on the colour spectrum. From this you can mix deep blue sky and ocean tones.
For a comprehensive guide on how to mix colours accurately, read our tutorial.
Work from a limited palette
Selecting a limited palette of colours can improve mixing skills and save money. Choose a few diverse set of pigments to bring harmony to your colour palette.
There are multiple different colours and palettes you could choose from, but a limited palette is generally defined as a colour palette containing six or fewer pigments (plus white and black).
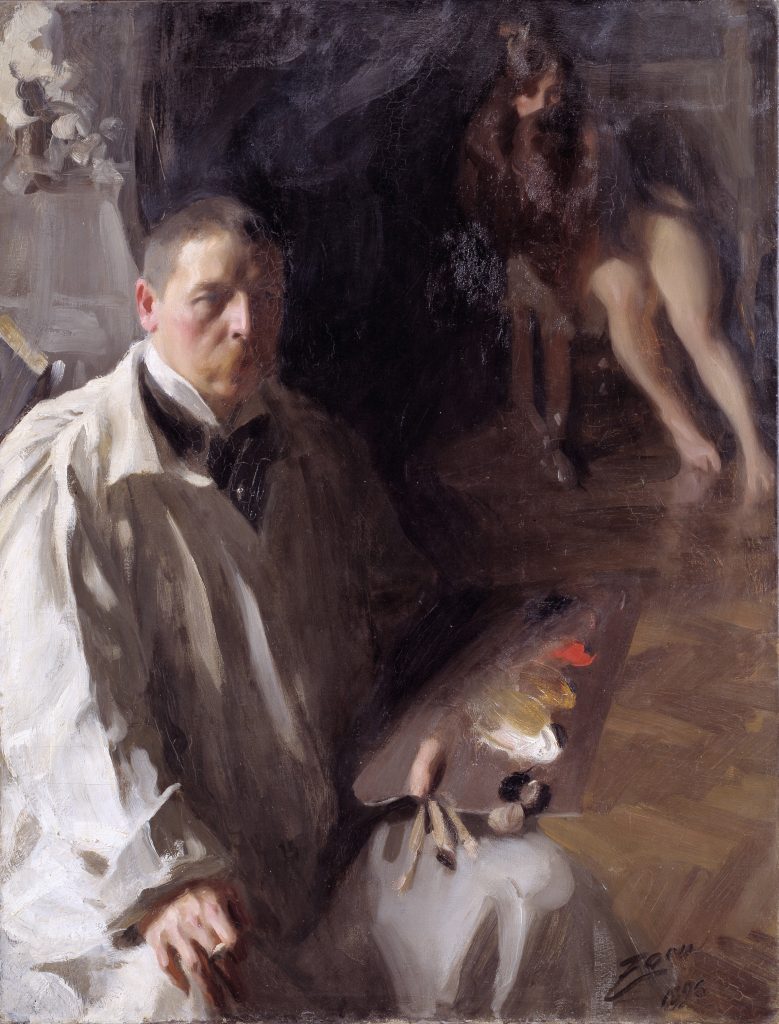
The Zorn palette, famously used by Swedish painter Anders Zorn, is a famous limited palette of just four pigments. The palette included vermilion or cadmium red, yellow ochre, ivory black and titanium white. Zorn used a form of each primary, as vermilion or cadmium red is a bright warm red, yellow ochre is an earthy yellow colour, ivory black is a dark low chroma blue and titanium white is an opaque white pigment used for tinting colours. This palette doesn’t provide a huge chromatic range, but it provides a value range that enabled the artist to convey realism when painting people, as portraits can be completed in muted tones. Look at his self portrait, you can see the colours he used for painting on his palette.
Check out our limited palette guide to find some more examples of palettes you can use to create harmony and organisation in your artwork. Find palettes for portrait painting, seascape and landscape painting. Using a limited palette will help you to understand the properties of the few pigments you select fully, then as your skills develop, you can add more colours to your repertoire if you wish.
Use texture
To create the impression of realism in an artwork, you don’t have to spend hours toiling away with a tiny brush making individual marks. Build layers of texture to create the impression of grass, bark, rocks or waves in the sea. If you’re a portrait painter, it’s possible create hair textures with a few brush marks instead of lining each individual strand.
There are two methods of creating the appearance of texture; both can be used with watercolour, gouache, oil and acrylic.
The most effective way to create organic texture with watercolour and gouache, use a technique called the dry brush technique and cold pressed paper. Load the brush with colour, then absorb the excess with a paper towel. You will be left with a relatively dry brush that has some remaining colour in it. Brush the colour over the cold pressed paper, because the brush is dry, it will pick up the texture. This technique can also be done with oil and acrylic paint on canvas.
The other method is to get a brush that will create multiple lines with one brushstroke. With gouache or watercolour, use a soft fan brush that will naturally splay when wet, to detail multiple lines at once.
With oil paint or acrylic paint, you can use a soft fan brush to create texture but make the paint runny by adding some linseed oil or a thinning medium for acrylic. Alternatively, use a stiff hog or synthetic hog brush and work it into the canvas to create textured edges.
This method of using texture to create the illusion of detail will make you. amore efficient painter.
Use the grid method to improve drawing accuracy

To instantly improve drawing accuracy, use the grid method. This involves creating a grid over your reference, then drawing a grid with the same proportions to fit to the painting surface. The lines on the grid will act as reference points for different elements, so you can accurately scale up the reference as a drawing on the surface. For example, if your canvas has an aspect ratio of 2:3, crop your reference photo in Photoshop so that it has the same aspect ratio, for example 1000x1500px. Then create a grid over the surface with the same number of lines vertically and horizontally. You will be able to see from your reference how the image corresponds to your canvas.
Another option is using the transfer method. This method only works if your final canvas is the same size as your reference. Your reference could be a sketch you created on paper, for example. Use tracing paper to sketch the outlines of the drawing, then tape to the canvas in the position you want the drawing. Secure transfer paper beneath the tracing paper and trace over lines with a stylus.
Both these methods will improve accuracy, which is especially important for commission work. For a full overview of both the grid and transfer methods, plus supplies list, read the tutorial.
Variation in subject matter
Sometimes trying something new can give us a new approach or depth of understanding to something we have been doing repeatedly, and not getting anywhere with.

For example, if your sticking point in a portrait is the nose—go back to basics and draw a sphere shape. It’ll make you pay attention to the position of light and shadows, which can inform you how to determine a lightsource and shade a more complex shape.
Practising solely drawing anatomy if you’re a landscape painter will better prepare you when it comes to adding figures to your landscape painting.
Choose your medium carefully
It may be that a particular painting medium is suited to your style, learn about the different painting and drawing mediums so you can choose the right one.
Understanding the working properties of your medium of choice will make you more able to use techniques with confidence.
Pencil: Graphite, oil pencil and watercolour pencil
Graphite pencils are the most common type of pencils you’ll come across. With a soft 6B pencil, you will be able to apply pressure to the paper to achieve variation in values. Many artists will enjoy drawing with graphite or use graphite drawing as part of their art creation process.
Oil and wax pencils are types of artist grade colour pencils. They are highly pigmented and sets come with a huge variety of rich colours. These coloured pencils can be layered and blended to achieve hyper realistic drawings. Oil or wax pencils would suit someone who is attracted to the style of realism and enjoys working with pencil but wants to create works that look almost like paintings.
Watercolour pencil is another kind of coloured pencil, what makes it different to others is that it is water soluble. Use them like regular pencils to create a drawing, then add water if you choose to blend colours seamlessly. With more water added, watercolour effects can be achieved. This bridges the gap between pencil and watercolour, making watercolour feel more accessible. Water soluble pencils can be used alongside gouache or watercolour too. Use the pencils over watercolour paintings for details, for example.
Pastel: Soft pastel vs oil pastel
Pastel is a brilliant and fun medium that encourages expressive techniques. Soft pastel and oil pastel are actually two completely different mediums that cannot be used together. Oil pastel uses oil and wax as a binder, whereas soft pastel is made with a mixture of chalk and other components like gum arabic. Both types are highly pigmented and easy to blend, but there are noticeable differences in the properties.
Soft pastels are often more vibrant in colour, softer but velvety in texture, drier and more dusty. Oil pastels on the other hand have a creamy texture; they feel slick and oily. Soft pastels have a matte finish, whereas oil pastels have a satin finish.
Oil pastels are perhaps easier for complete beginners to get to grips with, as the pastels themselves are more robust.
Paint: Oil, acrylic, watercolour or gouache
The four most popular paint mediums are watercolour, oil, acrylic and gouache. Each medium will suit a particular kind of practice and painter.
Oil paint
Oil paint is a vibrant, archival, slow drying medium. It’s buttery and luxurious in texture, and is conducive to techniques such as blending and glazing. The paint is versatile, as a multitude of different mediums can be added to change the properties of the paint. For example, add cold wax to thicken paint and retain brushstrokes on the canvas, or add linseed oil to make paint runny and more transparent. Depending on the mediums added, artists can achieve striking texture or fine detail. Oil paint is the most expensive paint medium to get started with, it is possible to start oil painting on a budget, however. If you think you would enjoy the slow drying nature, the luminous quality and archival properties of oil paint, it could be an excellent choice of medium.
Acrylic paint
Acrylic paint has similar qualities to oil paint in terms of handling, versatility and appearance. The main difference, apart from the fact it is made with polymer resin instead of oil, is that it is fast drying, with an average drying time of around 30 minutes. This is great for those who like to work quickly, in multiple separate layers. However, for artists who like to work wet on wet, or blend into paint for hours at a time, acrylic will not stay open and workable unless a medium is added. Acrylic is water resistant when dry and can be used to paint on canvas, panel or paper.
Watercolour & gouache
Watercolour and gouache are made from the same ingredients of pigment and gum arabic. They are fast drying, water soluble and wettable when dry. This means you can work into dry colours on the paper and rewet squeezed tube paint on the palette. The main difference between watercolour and gouache is that gouache is opaque and watercolour is transparent.
Watercolour is a delicate medium that artists use on paper, working light to dark. Gouache on the other hand can be layered dark to light, with highlights left until last due to its opacity.
Variation in medium
Working in different mediums can exercise different art muscles, which can help you improve your skills in other areas quickly.
Because pencil drawing is so fast to set up, transportable and affordable, it’s easy to get started with. Skills learned pencil drawing, such as accurately rendering proportions, paying attention to the structure of the subject and shading values are all transferable to other mediums. If you keep up a regular portrait sketching practice, this will put you in a better position when you come to map out the proportions of a portrait on a canvas with oil paints.
Working in watercolour requires discipline but makes you pay attention to mistakes you are making. As it is tricky to erase or paint over them. Painting with watercolour can help make you a more careful painter, as it will make artists more considerate, and deliberate with paint application.
Gouache is a great medium for oil and acrylic painters. It’s easy to set up, clean away and transport. Plus, it’s perfect for sketchbook work. These attributes encourage some painters to take up a more regular painting practice, when they don’t have time to get the oils out, gouache is a great alternative. Artists can quickly work in opaque layers to create vivid, beautiful paintings.
Paint or draw on location

Painting from a reference photo in a studio will not give you the same experience as painting on location. The quality of light will be different and the colours will appear much more true to form. There will also be other details that may command your attention, that you may have missed from just a photo.
Take your pochade box, easel, or sketchbook to paint en plein air. The key is to capture the light of the scene before it starts to change. If you paint slowly, take a photo when the light is perfect so you can translate it to your canvas.

If you prefer portrait art to landscape painting, go to a life drawing class. Classes will be set up differently, but usually artists are given a set amount of time to complete each drawing. It’s an excellent way to practice speeding up at drawing too.
Talking about timing…
If you feel like your skills are where you want them to be, but you want to speed up at painting, time yourself. Think about the amount of time you would ideally want to spend completing a painting. Then time yourself from start to finish. When you get to your time limit just stop. You’ll probably find that you automatically painted much faster, yielding more spontaneous results. Analyse the finished piece, what would you change about it? Note down areas you need to work on, that you struggle with when painting at speed.
Learn the essential techniques
Learning a few essential techniques can help you to develop your skills faster.
Watercolour and gouache techniques such as painting a smooth, flat wash and creating texture with a dry brush will instantly allow you to build layers of colour in a controlled and intentional way. Watercolour paint can also be lifted from the paper using the lifting technique to reveal areas of whitespace.
Oil paint is a versatile medium that you can use to create a variety of effects. It dries slowly, so oil painting techniques such as blending and alla prima (wet on wet) work brilliantly. Due to the transparency of certain pigments, colours from previous layers can be altered by glazing—this technique creates especially vibrant yet delicate looking artworks.
Acrylic painting techniques are similar to oil painting techniques. Build texture with the impasto technique and heavy body paint, or wait for each layer to dry to create fine glazes.
Pencil techniques include different methods of creating value transitions. Effects such as stippling, hatching and cross hatching will create texture and variety in a drawing. You can also get graphite in powder form and brush it onto paper for smooth blends and to cover large areas. Optionally erase the powder to reveal highlights and small details.
Soft pastel is an expressive yet versatile medium. Use a pastel on its side to cover large areas, or on the edge for detail work. Use the scumbling technique to mix colour, or add water to create a wash.
Learn how to layer oil pastel, release more colour by heating it, or use alongside watercolour in our oil pastel techniques guide.
Invest in some quality supplies
Artist quality supplies can improve art, as they are made from better materials that are more durable, perform better and last longer.
For example, if you work on paper with pencil, watercolour or gouache, make sure to get acid-free paper, as this won’t degrade or yellow over time. Working with archival grade materials is especially important if you plan to sell your work, or keep it hung on the wall for any length of time.
Artist quality supplies for oil paint and acrylic paint include paint that’s made with permanent, lightfast pigments and a high quality binder.
Getting the right paint brush is especially important for watercolour and gouache paint, as paint is low viscosity and requires a soft yet absorbent brush that tapers to a point.
Oil pastel, coloured pencil and soft pastel supplies are a little cheaper, but getting a sanded surface with ‘tooth’ that allows pastel and pastel pencil to adhere is imperative.
Improving your studio space, to feel more organised and comfortable can also optimise your art making process. Check out our studio supplies guide to find lighting solutions, easels, taborets and more.
Find your art style
Hone and develop your own unique voice as an artist by practising your favourite set of techniques with your chosen medium. An art style is the use of subject matter, approaches, mediums, ideas and themes that makes an artist’s work recognisable.
Learn how to develop your style as an artist in our tutorial.
Have fun with the process
When developing techniques, or sticking to a routine, art can start to feel difficult. If you feel like you’re being challenged, that’s a good thing! It means you’re learning and progressing. Plus, as your skills progress, you will likely develop a more critical eye for your own art, which can make you feel like your skills are plateauing, even if they are not.
As you start to get more serious about your art practice, it’s important to save time for doodling and experimentation. It’s good to to remind yourself occasionally why you started your art journey in the first place. Creating art is not always about achieving perfect results, we also do it for the pure enjoyment that comes from putting colour to paper. You might be surprised at what comes out of these freeform sessions, whether it’s a new idea, or technique that you wouldn’t have otherwise found if you had been sticking to a more routine practice.
If you’ve found anything on this site especially useful, you can make a donation to me through PayPal. I take a lot of time to research and write each topic, making sure each tutorial is as detailed as possible and I make all my content freely available. Any small donation (even the price of a cup of coffee!) can help me to cover the running costs of the site. Any help from my readers is much appreciated :).
Follow the link in the button below to support this site.