
Art is best learned by doing, so feel free to grab a piece of paper and follow along with these 17 drawing techniques. Add depth, contrast and your own unique style to your drawings by combining your favourite techniques.
All you need is a pencil, piece of paper or sketchbook, eraser and pencil sharpener. If you’re not sure about which are the best pencil supplies, skip to the last section.
By learning and improving your pencil drawing techniques, you can be more precise when rendering values in your artworks. Get creative with the marks you make and try out some new approaches to drawing.
Disclaimer: Fine Art Tutorials is a reader supported site. When you make purchases through links on this site, we may earn a small commission at no extra cost to you.
Layering
Layering pencil marks isn’t the same as layering paint. Graphite isn’t a transparent medium, so you can create a finished looking piece all in one layer.
The concept of layering in drawing, refers to the process of starting with a light sketch then slowly building in the dark areas to create shadow. Most artists will use this process to plan out where the elements fit before committing to dark lines which are more difficult to erase.

Underdrawing

The underdrawing acts as the first layer of an artwork, it can form the first stage of the drawing process. This is especially true for pieces that require more accuracy or time investment.
Draw a fine, light line to outline the main features of your subject. Then build on this layer afterwards with layers of shading.
To improve the accuracy of your drawing, you could create a sketch on another piece of paper first, then transfer it with tracing paper or with the grid method.
One constructive method of drawing that head that can act as an accurate portrait underdrawing is the Loomis Method. Start with basic shapes to measure proportions, then use these guides to fill in the features of the face.
Shading techniques
The following methods of hatching, stippling and tonal sketching are all types of shading techniques. These techniques will allow you to create values in your artwork. In art, a value is the relative lightness or darkness of a colour. So by using these different shading techniques, you can create highlights, shadows and give your drawing depth and form.
Hatching
Hatching is the technique of creating parallel lines to give the illusion of light and shadow. Draw lines closer together to create dark values, lines further from one another create highlights and mid tones in a drawing. Apply more pressure to the pencil for the darkest areas.
To be successful at the hatching technique, hold the pencil in a loose fashion. This means instead of pressing hard on the lead and using your wrist to draw, try and draw by keeping your wrist straight and moving your elbow. This will create longer, lighter, more sweeping strokes for the hatched lines. For extra long hatch lines, try keeping your elbow in one position and moving your shoulder to create pencil lines. It may seem basic to reassess how you hold a pencil, but especially if you’re a self taught artist, basics are easy to miss out on.
Cross hatching
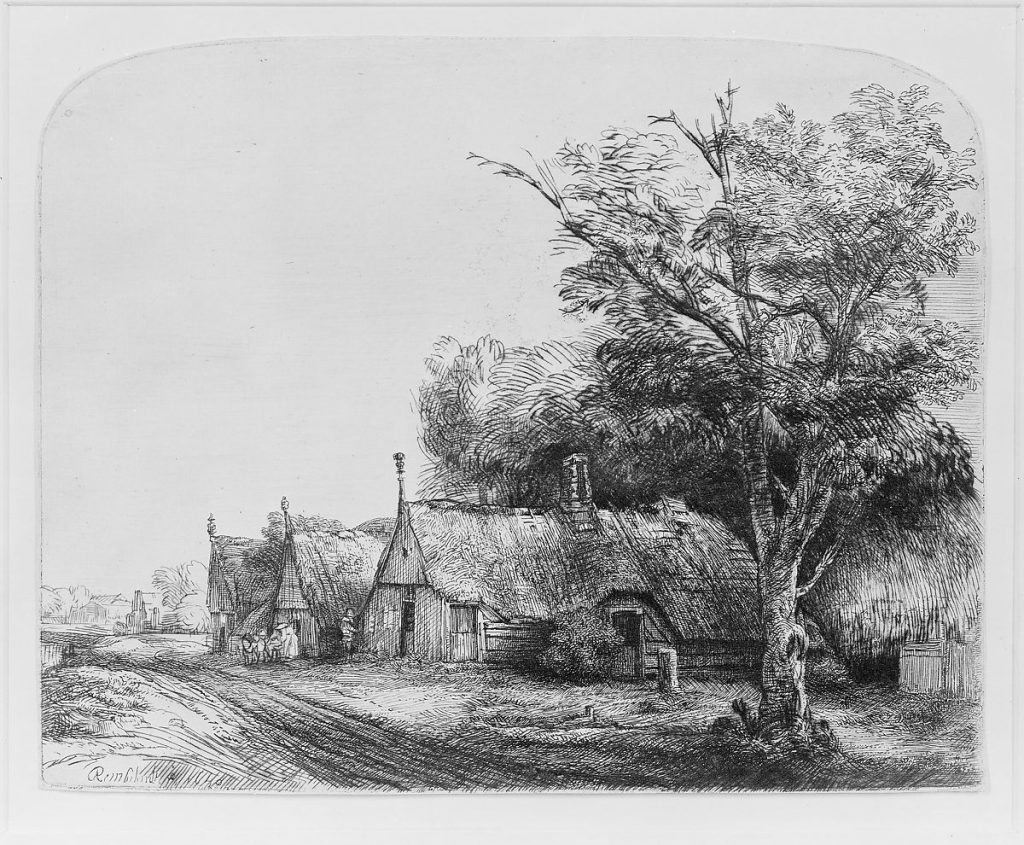
Cross hatching is a type of hatching, whereby parallel lines are drawn next to one another to create light and dark values. Perpendicular lines are then drawn over the top of the first lines in a similar hatching style. Rembrandt used this drawing technique in his etchings, ink drawings and silver point pieces. This is a versatile technique as you can use it with pen, graphite, charcoal or pen. Use this technique in conjunction with others on the list to create a variety of effects. Cross hatching creates a wonderful texture when you look at the drawing up close, but when you step away, it will appear as smoother shading.
Stippling
Similar to hatching, stippling is a technique of creating a repeat pattern on the paper to convey areas of light and dark in a drawing. Use a dotting action to render values. Create dots closer together to show darker areas and further apart for the highlights and light tones.
Bear in mind that if you use an unsharpened pencil, the dots will be thicker. A softer pencil 8B to B will give darker marks, whereas a hard lead pencil (F, H o r HB) will give lighter marks. Mechanical pencils are great for this technique.
Get a good quality pencil, like these from Caran D’ache, as cheaper pencil leads are more likely to break.
To do this technique yourself, hold the pencil vertically and close to the paper, then drop your hand to make the repeat dotting action. Go slower at first to keep it neat, but once you have the knack, it’s an easy technique to carry out. You’ll soon feel like you can create a drawing at some speed.

Tonal sketching
This shading technique is pretty simple and the most intuitive of all the drawing techniques. Apply pressure on the pencil where you want to place the shadows in the artwork.
To create an even shaded appearance, hold your pencil slightly at an angle and lightly move it backwards and forwards. Unsharpened pencils create softer lines, it’s also essential to use a soft pencil. Anything between 2B and 8B would work perfectly, depending on how dark you want the shading to be.
Scumbling
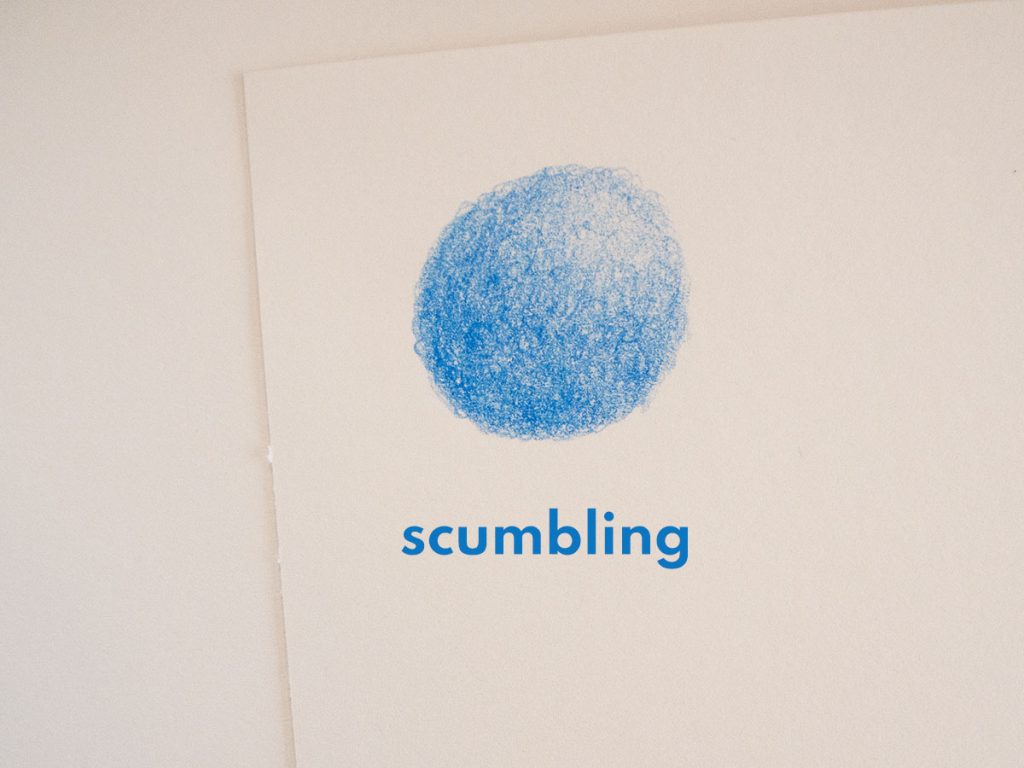
Scumbling is another shading technique, where small circular marks are layered on top of one another to create a textured appearance. The circles don’t have to be neat, apply more pressure to the pencil for darker areas of the drawing. If you’re drawing with coloured pencil, you can layer different colours on top of one another to alter the tones and hues.
Loose sketching
This is an approach to sketching which will give the effect of a more relaxed and effortless style. It’s a useful technique to try, especially if you’re a beginner and only used to trying to achieve precise fine lines.
By sketching loosely, you can plan compositions and practice drawing accurately without worrying about making mistakes. Create a loose sketch before you start drawing your final outlines, then you can erase parts of lines that don’t fit with your drawing afterwards.
With this approach, the aim is to focus on the big picture—the composition and interplay of different elements. You could optionally erase messy lines and add in details afterwards, or you could leave the drawing as a sketch.
To create a looser drawing, hold the pencil further up the casing and sketch with sweeping strokes moving your elbow instead of your wrist or fingers. You don’t need to press too hard on the paper when trying this technique.
Gesture drawing
This is similar to creating a loose sketch, but the purpose is to capture the movement of your subject in an expressive way. Gesture drawing mainly applies to drawing the human form and capturing the action and pose of the figure.
Time yourself when using this technique, as the purpose is to be quick and not overthink the placement of lines. Aim for around one minute per drawing. Don’t think about the details, like the facial expressions or hands, just focus on the form of the figure. This can form part of the first stage of figure drawing. It’s especially useful to practise this technique if you plan to do some life drawing. Gesture drawing is a great drawing exercise for portrait artists.
Blending drawing techniques
Graphite, charcoal and oil pencil can all be blended pretty easily. The softer the pencil, the easier it will be to blend.
For optimum blending, use 4B to 8B pencils. The blending technique goes hand in hand with creating a tonal sketch. Artists use blending to create realistic effects.
First create your tonal sketch. Make sure you create a good level of contrast by applying pressure for the darker areas of the drawing. Then, to blend, get a paper stump and rub into the pencil. You should see the pencil marks disappear, leaving smooth blended tonal gradations. If you don’t have a paper stump, you could use your finger to blend, although that can get messy.
A great trick to get the smoothest blends with graphite, is to brush some graphite powder onto the paper. Cover large areas of shadow. Areas that you have applied the powder will appear smooth, seamless and free of pencil marks.
Erase lines
Use the technique of lifting pencil marks from the paper, to reveal white highlights. To create precise highlights, get a Tombow Mono Zero eraser. You can use this to erase ultra slim lines, or use it for delicate details, like highlighting strands of hair in a portrait.
Another type of eraser that works great for this technique is a kneaded gum eraser. This type of eraser is soft and mouldable. Mould it into a point to erase small areas, or roll it across the paper to lift large areas of pencil. Kneadable erasers are soft, so they won’t completely lift dark pencil marks unless you press it into the paper with some pressure. Get some graphite powder and scatter across the paper, then draw on top with the erasers.
Frottage
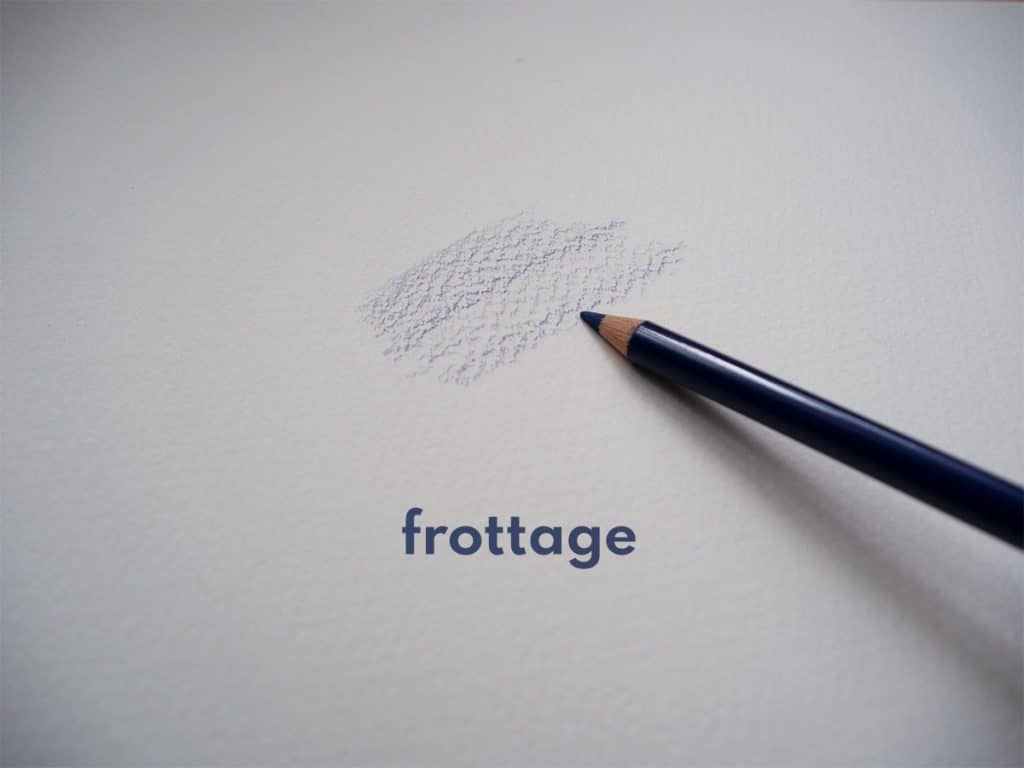
Use this technique on textured paper. Hold your pencil at an angle, so that the lead is completely sideways and flat on the paper. Then drag the pencil backwards and forwards. When drawing on cold-pressed watercolour paper, the paper’s texture will shine through.
Optionally, you could place an object underneath a sheet of paper, then use the frottage technique to pick up the details of the object.
Indenting
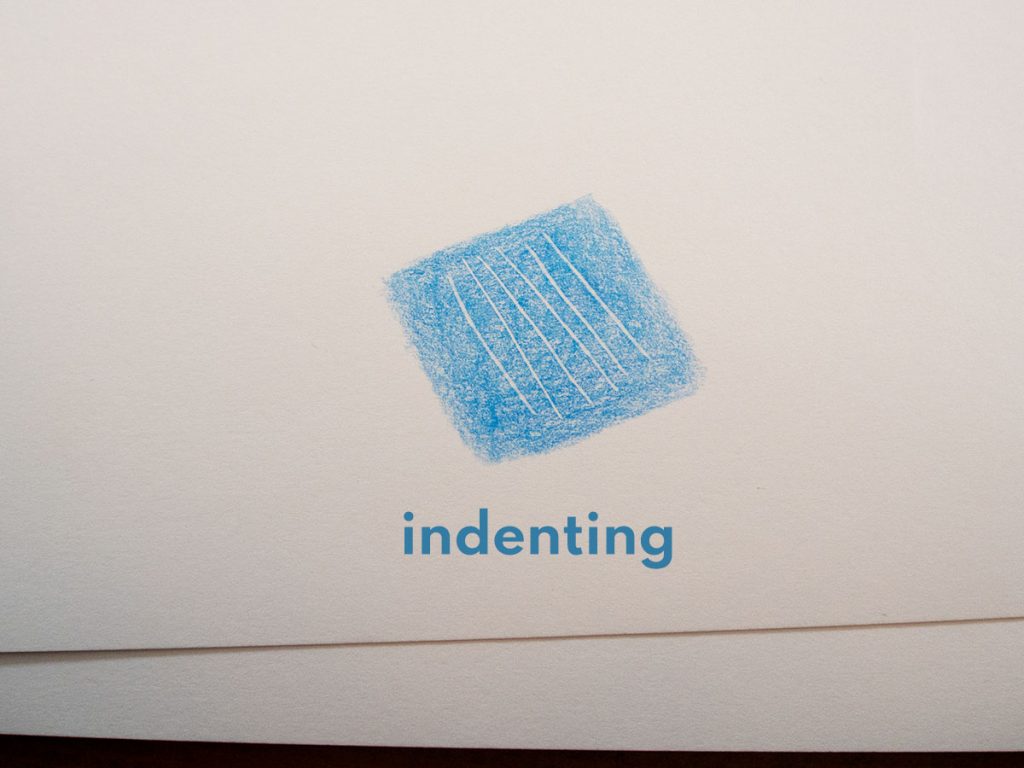
The indenting technique involves drawing lines on the paper to make indents rather than coloured marks. Then draw over the dents in the paper, by shading with the side of the pencil. The pencil marks will avoid the dent, leaving the white of the paper to show through.
There are two ways of creating a dent in the paper. Either get some tracing paper and draw with a pencil over your paper in places you want to show white highlights. Or use a stylus to create a dent in the paper.
Contour line drawing techniques
A contour drawing shows the outline of a subject. Contour lines show the outlines of edges and details. Use line weight to show the three dimensional form of the subject. Darker lines indicate areas of the subject that appear closer and lighter lines represent areas further away from view.
Cross contour line drawing techniques
This is similar to a contour drawing, but instead line weight and the spacing between lines represent the volume of a subject. Parallel lines are drawn across the form of the subject or object. Practice this technique by observing, the contour lines won’t be visible on the subject, but move the direction of your pencil with the form and mass of your reference.
Continuous line drawing techniques
To practise the continuous line drawing technique, draw a single line to create your image without removing the pencil from the paper. The line should be completely unbroken. This is a great tactic for developing observational skills, as it will force you to analyse your reference for longer before starting the drawing. You may find yourself creating cross contour lines to represent the volume of your subject, all without removing your pencil from the paper.
Detail work
Details add depth and realism to a drawing. For detail work, make sure your pencil is sharpened to a fine point. Use a quality pencil sharpener like this one. It will sharpen pencils to a long point, preserving more of the pencil lead.
Hold the pencil fairly close to the tip for extra precision. Drawing highly detailed work requires careful consideration and it takes time. You’ll find that you get into the flow of drawing details pretty quickly—it’s an enjoyable process.
Extra drawing techniques
Vary pressure applied to the pencil
By applying more pressure, you can create darker, thicker lines. To create the darkest lines, get a softer graphite pencil. 8B pencils will give you the darkest lines, whereas a harder lead pencil like H or F will give you lighter lines.
It feels quite intuitive to shade in this way, by increasing the pressure on the pencil for darker areas. By varying pressure, you can create anything from light sketches, to highly contrasted drawings.
Vary line thickness and style
With a softer pencil you will have more flexibility in creating variation in line thickness. Choose an unsharpened, soft pencil to create thick lines. A harder lead pencil that has been sharpened will give you the sharpest lines for the finest details.
Vary line thickness within a drawing to create a pleasing composition. Make elements stand out by emphasising them with thick lines.
Drawing precise lines will make an artwork feel neat and precise. To create ultra neat lines, try drawing with a harder pencil first, as the lines are light and easy to erase. Then you can go over these lines with a softer pencil. Alternatively, you could create a sketchy appearance by going over a line several times.
What supplies do I need for drawing?
- Pencils: Quality graphite pencils from H-8B are a great choice for artists. Caran d’Ache and Faber-Castell pencils feel smooth to draw with. Experiment with charcoal and coloured pencils if you want to execute a variety of effects with your drawing techniques. Find a review of the best pencils for drawing in our guide.
- Sharpener: a decent sharpener will preserve the pencil lead, prevent breakage and sharpen pencils to a swordfish-like point.
- Eraser: The Tombow Mono Zero eraser allows artists to erase ultra fine details. Kneaded erasers are softer and gentler on paper fibres. They are also really effective at erasing graphite. With a light touch you can lift some of the graphite, revealing mid tone highlights. With more pressure you can completely erase pencil marks.
- Paper: Drawing paper comes in a range of textures and thicknesses. Bristol Board is smooth and thick, which makes it an excellent choice for detail work and smooth shading.
- Sketchbook: this sketchbook by Etchr has thick, quality cotton pages.
- Paper blending stump: Tortillions are sharper and better for blending smaller details, sharpen the stump with sandpaper to remove graphite marks.
For a more comprehensive list of drawing supplies for artists, check out our guide!
Further reading
1. Artist’s Drawing Techniques: Discover How to Draw Landscapes, People, Still Lifes and More, in Pencil, Charcoal, Pen and Pastel
Discover 80 drawing techniques and step-by-step tutorials for beginner to advanced level artists.
2. Drawing Dimension – Shading Techniques: A Shading Guide for Teachers and Students
Learn to shade effectively and add dimension to your work. Accurately render light, shadows and mid tones with a look at different techniques and the possible applications.
3. This tutorial by Arteza gives some wonderful examples of mark making techniques you can make with pencil.
4. The Virtual Instructor gives some in depth examples of how to put different drawing techniques to practice.
If you’ve found anything on this site especially useful, you can make a donation to me through PayPal. I take a lot of time to research and write each topic, making sure each tutorial is as detailed as possible and I make all my content freely available. Any small donation (even the price of a cup of coffee!) can help me to cover the running costs of the site. Any help from my readers is much appreciated :).
Follow the link in the button below to support this site.
מהמם הסברים ברורים ומפורטים עם הגיון מאחרוי הדברים תודה ננ\הניתי ולמדיתי
Nices
Drawing is good,i like it
I can’t wait to try out some of these techniques. I’m bubbling with excitement already.
I love art 🎨🎭 art is life
I love this post! It’s so helpful and I can’t wait to try out some of the techniques!
Awesome
Very useful! Thanks!
Well presented and stimulating. Makes one excited and eager to get “stuck in”.
I enjoyed very much and I’ve learnd a lot. Thanks