
The stippling technique is a popular way to create interesting textures and patterns in art. It involves using small dots of ink or other drawing medium to build up an image.
The stippling technique can also be used to create shadows and highlights, by making the dots appear closer together, or further apart. This forms the contours of the shape and gives an image depth and realism.
Disclaimer: Fine Art Tutorials is a reader supported site. When you make purchases through links on this site, we may earn a small commission at no extra cost to you.
Stippling definition
Stippling is a drawing technique in which small, distinct dots are used to create a desired image or effect. The term “stippling” comes from the Dutch word for “small dot”. This technique can be used with a variety of mediums, including pencils, ink, and even in digital art. The purpose of stippling is to create the impression of highlights and shadows in an artwork, as a complete value range can be represented with the arrangement of dots.
Stippling shading: how to create a value range
Stippling is use to create a value range in a drawing with dots, this makes it a type of shading technique. The closer the dots are together, the darker the area will appear. The farther apart the dots are, the lighter the area will look. This technique can be used to create a wide range of effects, from very subtle shading to bold and graphic images. For the lightest highlights in a drawing, leave the paper free from dots, so that the white of the paper shows through. In the darkest areas of the drawing, the dots will appear compacted. Another similar shading technique that can be used to achieve a full tonal range is cross hatching, whereby artists draw a series of small parallel lines and perpendicular lines that cross over to create the appearance of light and shadow.
How to use the stippling technique
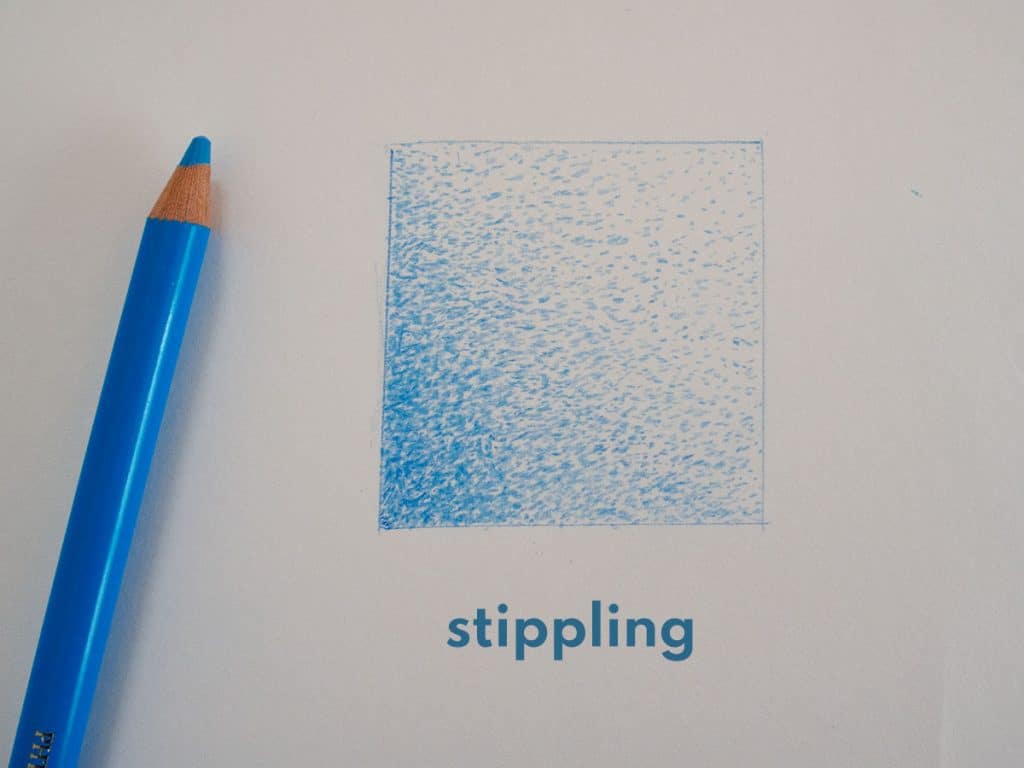
Start by shading a basic 2D shape, like a square and make a gradient from light at one end, to dark at the other. Start at the darkest end, as it’s easier to get into the rhythm of creating the repeat dot pattern. For precision, hold the pen close to the nib and move your wrist to stipple. Because it’s a repeat action, it’s quite easy to speed up after practising a few times. On the darkest end of the square, start with dots spaced apart from one another, then fill in the gaps to make a darker appearance. To create a smooth gradation from dark to light, stipple dots that are gradually further apart, the closer to the lighter edge they are.
This drawing exercise is great in practising the stippling technique in its most basic form, it will enable you to get into the flow of shading with the stippling action, so that when you come to shade more complex shapes and forms, you will be able to achieve more precision.
Once you’ve had a go at shading a 2D shape, try shading a basic 3D shape, like a sphere. It can feel like a challenge accurately representing a curved edge, as light appears to diffuse more softly around the form. Practise shading the sphere a few times, then you can move onto drawing objects from life. Start with simple objects, fruits like apples or cherries will hone your shading skills while introducing you to slightly more complex forms with more details.
Another approach to stippling is to create layers. Start with the lightest layer (dots that are spaced further apart) then gradually increase the closeness of the dots in the darker areas with each consecutive layer.
Stippling tips

Here are some tips to help you get the most out of your stippling:
- Use a harder pencil for more precise dots, or ink liner pens.
- Sketch a light outline with pencil first, which you can erase after shading.
- Analyse your reference thoroughly before you begin, look at the contrast between light and dark and how hard or soft the edges in the reference are. This will inform how you place your dots.
- Use the layering approach to stipple in tricky areas. I.e. start with fewer dots, then gradually increase the amount of dots with each layer until you are happy with the contrast between dark and light. This allows you to be more cautious with your shading, when shading subjects that are more challenging.
- Frequently step back from your artwork to look at the overall composition. This will help you to look at the effectiveness of the image as whole, rather than focussing on small details.
- Be patient! Stippling can take some time to master, but it’s worth it. It’s better not to rush and to complete a drawing more slowly and be happy with the result.
- Have fun! Experiment and don’t be afraid to try new things. For example, mix up the coloured ink pens you use to create a pop of vibrant colour in your stippled art.
The best mediums for the stippling technique
Ink pigment liners are arguably the best drawing tool for stippling. They come in a variety of nib sizes, which allows you to create different dot sizes. They’re also waterproof, so you can use them for painting as well as drawing.
You can use just about any drawing media with the stippling technique. However, harder pencils, such as HB work best. Softer pencils like charcoal pencils, which are more prone to breakage when pressure is applied may not be as suitable. Also be aware that unsharpened pencils will produce a softer, thicker and more blurred looking dot. The best pencils for the stippling technique are mechanical pencils, as they are retractable and preserve their point, allowing artists to create more consistent dot shapes.
When was stippling invented?
Stippling was invented by Italian engraver Giulio Campagnola in 1510. It was then used in 17th century England by Isaac Beckett to create a shading effect in mezzotint portraits. Today, artists most commonly use this technique using ink pigment liners or mechanical pencils.
What are some benefits of stippling?
This technique is relatively quick and easy to learn. And, once you have the hang of it, you can create some stunning results.
Another benefit of stippling, is that it works beautifully with ink pen medium. Artists cannot use techniques like tonal shading with ink because the ink liners provide a solid, consistent line. It’s a great way to utilise the popular drawing tool.
Are there any drawbacks to stippling?
One potential drawback to stippling is that it can be time-consuming. This technique requires patience and a steady hand. It also takes practice to perfect.
Another drawback to stippling is that it can be challenging to get a smooth gradient with this technique. This is because, unlike with the tonal shading technique, artists cannot vary the pressure they are applying to their pen. This means that all of the dots will be the same size and darkness. As a result, it can be difficult to create a smooth transition from light to dark.
Despite these potential drawbacks, stippling is a fun and rewarding drawing technique that anyone can learn with a bit of practice. So, don’t be discouraged if your first attempts aren’t perfect.
Stippling and pointillism
These are two separate techniques; the stippling technique is mostly associated with pen and ink drawing, whereas pointillism art is made with paint. In a pointillist painting, coloured dots blend together to create colour contrast and the appearance of a new hue. Pointillism began as a variation of impressionism and Post-Impressionism, Van Gogh, Picasso and Paul Signac are all famous for using this technique.
Stippling examples
Here are some examples of stippling art to give you some inspiration. As you can see, this technique can be used to create a variety of different effects, from photorealistic portraits to whimsical illustrations.
In this video, Jim Reed demonstrates how to start a drawing with the stippling technique. He uses layers to create contrast and edges on the complex form of a rhino.
Here, Sarah Mari Lucas demonstrates how to draw a mountain illustration, using stippling for the shading on the rocks of the mountain.
Stippling drawing ideas
You can draw and shade just about anything you can imagine with the stippling technique. Here are a few ideas.
Make your own still life arrangement
Arrange different items of varying texture, like fruit, leaves, fabric, etc. Then, experiment with stippling to see how you can create different effects. Make sure to set it up with adequate lighting so that the light stays consistent throughout the drawing session.
Shade a portrait
Or, try your hand at portraiture and either draw a self portrait, draw a friend or family member, or find a stock photo reference online to draw from. Portraits are difficult subjects to draw as the shadows are mostly soft in appearance and it can be tricky getting the proportions right. However, by practising drawing easier shapes like spheres, it can improve your skills at rendering diffused light over rounded edges.
Copy a master’s work
Find your favourite old masters painting and replicate it using the stippling technique. It’s a great way to bring new life to an old favourite painting, plus it will challenge your skills at drawing complex subjects.
If you want more drawing ideas, check out our guide of 70+ ideas!
Finally
It’s important to have fun and be creative with your drawings. Remember, there are no rules when it comes to art. So, don’t be afraid to experiment and try new things. With a bit of practice, you’ll be creating beautiful stippled drawings in no time!
If you’re just getting started with drawing, we have a free ebook that we’re giving out to all of our readers. To get yours, join our Facebook Group, navigate to the Guides section and download the book. The group is a space for like-minded artists to share their art, tips and techniques.
enjoyed
I first saw stippling be done by a teenage patient I was taking care of back in the 90’s when I worked in the hospital. I have always been interested in stippling ever since.
> really like this kind of information, because I love stippling and puntialism, I am not a profesional drawing, but I love to sketch using pen and ink.