
Oil painting for beginners: 12 tips on how to get started and take your skills to the next level.
You’re learning how to oil paint! Prepare to be taken on a journey. Oil painting is a great choice for beginners. Because it’s a flexible and varied medium. You can achieve a variety of effects, depending on which techniques and materials you use.
As a beginner, the first steps of getting started with oil painting will be learning about several core principles. First, learn the ins and outs of the materials you need. Then find out how to clean up safely. Learning oil painting techniques and putting them to practice will be the final step. Once you’ve grasped the basics of oil painting, it can be fairly easy to improve quickly.
Learn about the supplies you need, the basic techniques and tips on how to mix colour for artists. This tutorial will guide you through everything you need to know to get started with oil painting for beginners.
Feel free to bookmark this guide and refer back to it. It may feel like a lot to take in from first read, but trust me, it’s so worth it! Once you get into the swing of oil painting, it’s one of the most relaxing and rewarding things you can do.
Disclaimer: Fine Art Tutorials is a reader supported site. When you make purchases through links on this site, we may earn a small commission at no extra cost to you.
1. Oil painting for beginners: Supplies

Getting good quality materials will make a huge difference to your painting experience. It’ll make the process so much more enjoyable and your finished pieces will look a lot better too!
You don’t have to spend loads of money on materials when you’re just starting out. However, when you’ve decided that you’re serious about wanting to improve, I do advise saving up a bit to invest in some quality materials that will last, rather than splashing out on bad quality tools then having to buy everything again when they very quickly break or get worn out. Doing it this way gets you started on the right foot with your own oil painting practice.
I’ll run over the basics. For more information on painting materials and the products I recommend, check out the oil painting for beginners: supplies guide. It covers all the materials, what they do and how to use them.
Oil painting for beginners: The essential supplies to get you started
I’ve linked to products I recommend below:
Best oil paint
Starting off with a limited palette of primaries is a way to spend less money whilst improving your mixing skills. As from the primary colours you can mix a wide range of hues and tones.
Take a look at some of the different brands of oil paint too. Different brands come at different price points, but will also vary in quality and working properties. A reasonable but quality brand like Winsor & Newton is great for beginners. Gamblin, M. Graham, Schmincke and Michael Harding are excellent quality brands worth trying.
Paint brushes
Pick up a few brushes in different sizes. Flat (square shaped) and round brushes are a good place to start.
Oil paint is viscous in nature. This means you will need stiff or springy brushes to move the oil paint across your surface. Either hog hair fibres or stiff synthetic fibres will work for this. If you make your paint runny with a medium, use softer fibres like these sable hair brushes from Da Vinci.
Oil painting for beginners: The best palettes
Glass is best to mix oil paint on and clean. Just make sure the palette you choose is completely flat as you want more space available for mixing. This palette from New Wave is made from tempered glass for extra safety. It has a large area for mixing and comes in three colours.
Palette knives are useful for mixing too.
The best surfaces
Canvas, oil paper, wood, even some types of metal are all surfaces of choice for oil painters, so get experimenting! These cradled, smooth primed wooden panels by Ampersand feel like a dream to paint onto. Their smooth texture makes rendering details feel easy.
Make sure that the surface you get is either pre-primed, or that you have prepared the surface yourself.
Choose a medium
Mediums: Oil paint doesn’t mix with water. So you’ll have to use other mediums to thin paint, clean paint from materials, and change the viscosity. You can also use a medium such as linseed oil to reduce the viscosity and make paint dry more slowly.
Supplies for cleaning up
Brush soap: Some artists choose to clean materials with solvent. However, this can be bad for your health and air quality in the space you’re painting. Instead, you can get brush soap to clean the paint from your brushes. It will keep your space free of paint fumes.
The best varnish
Gamvar varnish is a brilliant option for beginners. It comes in three finishes, gloss, matte and satin. This is an additional extra, but one that most oil painters use to protect their work and make it last longer.
Varnish protects oil paintings from UV rays, which cause colours to fade. On top of this, it creates a protective barrier that prevents the painting from getting dusty or dirty. Eventually, the layer of varnish can be removed and along with it all the dirt accumulated from tens of years of normal wear and tear.
Choose an easel
Easel: You can find relatively inexpensive easels perfect for beginners. For example, a smaller tabletop easel. Larger studio easels will be more expensive, but aren’t essential when you first start out. Mabef easels are high quality and affordable.
If you are on a tight budget, read on how to save money whilst learning to oil paint.
2. Follow the most important rule…
Oil painting involves layering paint on a surface—there is an order to the way paint is layered.
Oil painters build paint layers according to the fat over lean rule. It describes how the oil content of paint is gradually increased in each consecutive film of paint. The top layers of the painting should dry more slowly than the previous and be more flexible.
Fat layers of paint are oily, lean paint has been thinned with solvent. Layers with more oil in the mix should be painted on top of layers that are less oily.
Oil rich (or fat) layers dry slower than thin layers that have less oil content. When oil dries (or cures) it undergoes an oxidation process. It shifts and shrinks as it reacts with the oxygen in the air to reach its solid form. So if the top layer of paint is thinner and has dried already, and a fatter layer beneath is still curing, it can cause the top layer to crack, as it shifts with the layer below it.
So an example of a layering process would be, starting your underpainting by adding a small amount of solvent such as turpentine to the paint, then layering tube paint on top.
Solvent dries by evaporation, so adding a small amount to your oil paint means that it will evaporate from the surface quickly, leaving a very thin and evenly dispersed layer of oil paint to cure. Oil rich layers will soak into the layers beneath.
This is just an example, you don’t have to paint with solvent. You could paint straight from the tube and layer paint mixed with extra oil on top, for example.
To be on the safe side, you could wait until the previous layer is touch dry before you apply another layer.
3. Keep your materials clean
Trust me—it’s better to just clean brushes and other materials as you go. When the paint dries, it’s much more difficult to clean from your materials.
It’s really important to keep on top of this as paint can accumulate near the ferrule of the brush (the metal clamp that holds the bristles together), which can cause a brush to become rock solid. There are ways to salvage a brush that has become stiff like this, read this guide on how to bring old brushes back to life to find out how.
Keep paint waste to a minimum
To keep paint waste to a minimum, you can keep paint on your palette overnight.
Oil paint can stay wet and workable for days at a time, so scrape off your mixed paints with a razor scraper and keep the squeezed paint around the edges of your palette ready to use and mix again the following day.
To make sure it keeps overnight (or for even longer) place the palette in a sealed container, like Masterson’s Palette Sealer to make sure no air gets to it. You can even cover it and put it in the fridge to ensure it doesn’t harden at all. The cold delays the oxidation process of the oil. I’ve kept my paint workable for weeks by using this method.
Condition your paint brushes
Regularly condition your brushes. This way you can use them for years to come.
A brush conditioner, like the Master’s Brush Cleaner and Preserver softens bristles, keeps them springy, prevents paint build up near the ferrule and actually helps bristles to hold more paint when they are next used. The conditioner also cleans bristles and can restore paint brushes that have hardened oil stuck in the bristles.
How to dispose of oily waste
Drying oil is combustible so paper towels with oily waste on shouldn’t be left out. As they pose a fire hazard, they shouldn’t be thrown in a normal waste bin.
The solution to this is to get an airtight container and fill it partially with water. Keep your paper towels in this container until it’s full. To dispose of it, take it to your local hazardous waste facility. You could also call up your local council to enquire about where to dispose of it properly in your area.
For reusable lint-free cloths that have oil waste on, drop them in soapy water as soon as you finish painting. Dish soap works fine for this. Leave them to soak for a bit and scrub to get the oil residue out.
If you choose to paint with solvent, you don’t have to throw away solvent after just a few uses. Solvent can be reused time and time again. If your solvent looks dirty, wait for a few days for the pigment to settle at the bottom of the jar. The two will eventually separate when left for some time. Then, get a coffee paper filter, or even cheesecloth and filter out the paint residue into a new jar. The solvent will look fresh and clean and you can reuse it again and again.
What can you use to clean oil paint?
Solvents like turpentine, odourless mineral spirit (white spirit) and oil of spike lavender will thin paint and remove oil paint residue from your materials.
Despite what you may have already read about oil painting, the use of solvent is not actually necessary. It’s possible to clean brushes without using solvent. This brings us onto our next tip…
4. You don’t have to use solvent for oil painting
The idea of using solvent puts a lot of people off learning to oil paint. This is understandable—breathing in solvent is bad for your health.
Even using odourless mineral spirits (OMS), which are meant to contain fewer of the aromatic hydrocarbons that are harmful to inhale can take a toll.
To use solvent, you really need a big working space with proper ventilation. That means having a large room to paint in with at least two windows you can open to allow air to circulate. Plus if you have any pets or kids that might be coming into your painting room, you might worry about them inhaling or even accidentally handling the solvent.
So for many people, it’s not practical to use. Luckily it’s easy to paint solvent-free.
How to oil paint solvent-free
You can choose not to thin your oil paint with solvent for the first layers of your painting. Instead, paint straight from the tube, or mix your paint with an alkyd to speed up the drying time and increase the volume of paint.
When it comes to cleaning, throughout your painting session clean your brushes with safflower oil. Safflower oil is a thin, runny oil that takes much longer to dry than linseed. It’s also less expensive. Keep some in a jar and before changing colours, instead of swilling brushes in solvent, dip them in the safflower oil and wipe on a paper towel. To keep the oil from forming a skin, cover the jar and keep it in the fridge overnight. It will stay fluid this way.
Safflower oil is useful for cleaning during the painting session to rid brushes of pigment before changing colours, but if left to dry it could leave oily residue on your brushes. If left out for a few days this could harden.
At the end of the painting session, then, use the brush soap I mentioned in the previous tip. The Masters Brush Soap is not just a brush conditioner, but a cleaner too. Work the soap into the bristles to form a lather and wipe the residue on a paper towel. The soap will loosen paint, but it’s the friction of wiping that will remove it. Try and work the soap into the ferrule, as that’s where paint gets stuck. There are cheaper brush soaps available too, like this one.
Thinning oil paint with a non-toxic solvent
There is an option for those who want to thin oil paints for the first few layers of their painting, but don’t want to use a harmful solvent. Oil of spike lavender has been used for centuries to thin oil paint and clean brushes.
It is a solvent, but research shows that it’s far less toxic than turpentine or odourless mineral spirits. In terms of its potency, it’s more effective at thinning paint than turpentine, so it can be used to thin damar resin too. Pigment contained in the solvent is dispersed evenly throughout the layer and the dried finish appears unified with a satin sheen.
Oil of spike lavender does not cause chronic health effects that are associated with turpentine and OMS. Plus it has a sweet, pleasant smell. It’s more expensive than turpentine, which is why OMS and turpentine are more widely used. Of course, leave the window open when using spike lavender oil, but in using it you don’t have to worry about the ill health effects. For example it is not a carcinogen.
5. Prepare your surface properly
One of the great things about oil painting is that there are lots of choices of surfaces to paint on. If you use raw wood or canvas, apply a few coats of gesso. Most oil paper, canvases and some wooden panels bought from art stores come pre-primed, so priming them yourself isn’t necessary.
These linen canvases can be painted straight onto with no further surface preparation. Smooth primed wooden panel provides a less textured surface, perfect for painting details. Save time and money by buying the ready primed surfaces.
Applying gesso to a surface will increase the rigidity (if the surface is flexible) and create a barrier between the surface material and paint. If you don’t prepare a raw surface, oil can seep into the material and cause it to rot.
Priming is necessary for natural cotton or linen canvases, raw wooden panels and for if you want to create a smooth, eggshell finish on your canvas.
Prepare a surface for oil painting: steps
- Ensure that all your materials are clean and free from dust. You will need to seal raw wood first using a sealant. Apply two coats, waiting to dry between layers.
- Pour some acrylic gesso into a jar. You will only need enough to cover your surface once over.
- Apply one coat of acrylic gesso to your surface with a wide brush. For each brush stroke, maintain the direction you are painting in (i.e. top to bottom). Overlap strokes slightly to ensure you cover the whole surface.
- Clean your jar and brush with water.
- Wait for the surface to dry (this will take up to 45 minutes).
- Sand the surface with fine grain sandpaper.
- Wipe clean with a damp lint free cloth.
- Repeat all of these steps twice more. For each consecutive coat of gesso, change the direction of your brush strokes (i.e. side to side).
Three coats of gesso is enough to form that protective barrier on your surface.
6. Harness the properties of oil paint
Learning oil painting for beginners involves understanding the properties of pigment and paint. Some colours differ in drying times and the characteristics can vary from pigment to pigment.
Some student quality brands of oil paint will bulk their paint out with additives, fillers and stabilisers. This means that between colour tubes, you may find that drying times and working properties are fairly consistent.
If you use a professional quality paint brand, it will be likely to contain fewer additives and no fillers. This means that the paint has been made to be responsive to the unique properties of the pigment it contains.
Earth pigments are fast drying so they are appropriate to use in the first layers of a painting, or even as an underpainting. Colours such as titanium white dry more slowly, so think about using these in mixes for highlights in the final layers of the painting.
Some pigments are more transparent than others. This means that they will work well as glazes. Opaque pigments such as titanium white, will completely cover the colours in the layers before it.
Pigments also range in lightfastness. This describes the permanency of the colour and how it will transform over time. It’s measured on a lightfastness scale and is given an ASTM rating, with I being excellent, II being good and V being poor. Alizarin crimson has a lightfastness rating of III, fair. It is still sold and widely used by artists due to its versatility and potential uses in landscape painting. But, after just months of exposure to full sun (outdoors not indoors), the alizarin in an unvarnished painting will fade to nothing. Modern varnishes protect against UV, so make sure to varnish if you use this colour, or use the Permanent Alizarin alternative.
7. Oil painting for beginners: find information on the paint tube

It sounds obvious, but if you buy paint that is labelled ‘alkyd oil’, or ‘water mixable oil’, you won’t be able to mix these with your regular oil paints. Schmincke Mussini oil paints, which contain damar resin, can be used with regular paints, however.
Aside from telling you what type of paint is in the tube, you can find much more information about the contents of the paint on the packaging of the tube, which can give you an insight into how to use your paint best.
When your painting skills progress, you may become more picky in the kind of pigments you select to use in your work. Many professionals only use tubes that contain a single pigment, as this gives much cleaner mixes.
You can find this information on the tube, as well as what type of oil binder was used as the vehicle in the paint.
8. Understand how to use colour
You’ve made it this far, so I’m going to explain colour theory—which is more of an intermediate level topic.
Learning about colour theory is a rabbit hole, but it’s rewarding, as it will make you perceive the colours you see in everyday life differently and use them more effectively in your work.
It’s not as simple as red, blue and yellow
The primary colours in painting are not technically red, yellow and blue, but rather specific types of red, yellow and blue. When referring to primary colours in pigment form, it’s more accurate to look at the cyan, magenta and yellow colour model (CMYK).
Cyan, magenta and yellow sit in a triad formation on a colour wheel. These are the colours that lay the base for mixing to make the widest spectrum of colours from just three pigments. From these you can mix secondary colours, tertiary colours and all other tonal variations.
These three primary colours have corresponding pigments—the pigments aren’t exact primaries, but they’re pretty close. These pigments have codes: PB15 (Cyan), PV19 (Magenta), PY128 (Yellow). I’ll suggest which manufacturer’s primary colours to start with in the coming section.
When you look at any colour around you, you’ll notice that most ‘primary’ colours lean towards another primary. You’ll see greenish blues (that have yellow undertones), or reddish blues (that appear more purple). This is something that might not always be completely obvious to the untrained eye, but once you’ve made yourself see colour this way, it’ll give you much greater control and skill when it comes to mixing.
Using a colour wheel as a reference
It helps to look at a colour wheel to determine the relationships between colours. It organises colour geometrically so you can visualise how they can be mixed on your palette.

The CMYK colour model isn’t perfect for mixing pigment, there are many colours that are omitted from the model. For example, try to mix a deep crimson and it will likely come out muddy. For this reason, artists that use this primary palette add to it warm and cool versions of the primaries, that fill in some of the gaps that just cyan, magenta yellow misses off.
It’s important to note too, that while most artists will have versions of red, blue and yellow in their palette, not all will use the CMY model of painting. This may be because it doesn’t suit their style, their subject matter, or they’ve found pigments that suit their process better. The reason I’m introducing CMY as a beginner’s limited palette is because of the range of colours you can make. You can mix the greatest range of colours from the fewest tubes of paint.
This means that if you choose to start with these three and practise mixing, you’ll soon realise that you don’t need to add too many extra tubes to your collection, which is perfect for a beginner, as it will save you money from the offset.
What is the colour mixing process?
Buy your own colour wheel here.
You’ll need paint, a palette knife and a palette to mix onto to start. But how do artists mix accurate values and tones that match the colours in their reference?
Colour mixing is a complex topic, but when you first start painting, the CMYK colour wheel can be used as a loose guide, one that can aid you in determining how colours relate to one another.
Colour mixing can be approached in a completely intuitive and spontaneous manner, but if you want to improve your skills to achieve more realistic colours, or give yourself better control in your use of colour, I’ve broken the process used by professional oil painters down into steps…
First, isolate the colour you want to paint
The colour mixing process requires the painter to study the reference and isolate the colour they want to reproduce in their work like so:

A colour in context is actually pretty difficult to isolate, as the surrounding colours can alter the appearance of the colour in question.
To make it easier, you could use a tool like Photoshop, or another photo editing programme. Use the picker tool to sample the colour from your photo reference. Just make sure that your document is in CMYK mode first.
If you aren’t painting from a photograph—you’re painting from life or on the field, or if you don’t have photo editing software, then you can use a tool to physically isolate colour. Use a viewcatcher to look through to see the colour in isolation.
Another option is to focus on the colour and describe it. What is the masstone? How saturated is it? How dark or light is it? Doing this can advance your natural skills in colour perception.
Find its place on the colour wheel
Locate your colour on the wheel. Its coordinates will inform you about the proportions of colours you should mix to make it. Describe its position on the wheel.
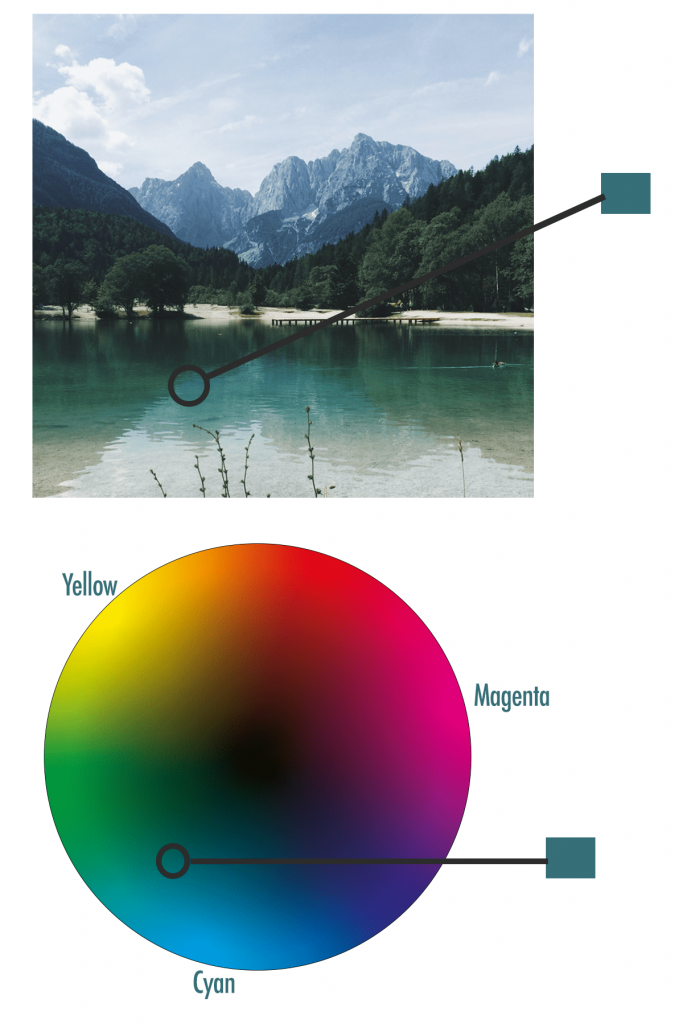
For example, if it is closest to cyan, then blue is its masstone. If it points towards yellow, then it has yellow undertones. If it’s nearer the middle of the wheel, then it doesn’t have a high level of saturation and it should be neutralised with its complementary colour. In the case of this colour, the complementary will be a magenta-red.
From this description, here is the visualisation of that colour, you might call it teal.
Mix the corresponding pigments
Using the example of teal, I’ll give you an estimation of how to mix your pigments to make this colour.
The mixture will include primary cyan, (the corresponding pigment is phthalocyanine, which often has a marketing name of phthalo blue), primary yellow, and magenta-red (this will be magenta mixed with a small amount of yellow).
So the mixture should be roughly 2 parts cyan, 1 part yellow, .5 parts magenta. To lighten it add some titanium white.
It takes practice to perfect this process, but honestly it will become intuitive. Painters who have been practising for years will just look at their reference, mix their colour without using any tools to help them and get it right the first time, in a matter of seconds as if it is second nature. This takes practise, but it will come.
Mix complementary colours to neutralise the paint
You’ve seen already in the example of making teal, that the blue-green colour was neutralised with the addition of its complementary colour.
Having an understanding of the other colours your pigments lean towards will help you to avoid making muddy mixtures and assist you in making the vibrant colours you intend to make.
Adding a yellow toned red, like cadmium red light to a yellow toned blue, like phthalo blue, will make a very dull desaturated purple. This is because both colours lean towards yellow. It won’t look anything like the kind of intense violet you can achieve from mixing ultramarine (which has reddish undertones) with magenta PV19, for example.
If you want to create realistic colours in your paintings, you will hardly aim to mix these highly saturated and vibrant colours. Neutral colours are more realistic and more elegant too.
To create landscapes, still life or portraits with realistic tones, you probably won’t need to use grey or black for shadows. Simply use contrasting colours already on your palette that you have used throughout your painting. It’s possible to make a variety of warm and cool greys that will harmonise with the colours in your painting.
All three primary pigments mixed together in equal measures makes a dull grey-ish colour, but to deepen this to create you could add Burnt Umber.
How to choose your palette of oil colours
To form a basic palette, if you want to be able to create a wide range of vivid colours, you’ll need primary colours and a few others to mix to make any colour you wish.
The pigments that closely correspond to the primaries in oil paint are:
- PB15: Phthalocyanine blue
- PV19: Magenta
- PY128: Transparent yellow
A split primary palette is one that includes the primaries and a warm or cool version of the primary. This palette gives you the potential to create the greatest variety of hue transitions including colours that the CMYK model omits.
To create hues
- This is a warm red that leans towards yellow on the colour wheel.
- A primary red, it appears to have cool undertones straight from the tube. But it mixes with yellow to make intensely vibrant oranges.
- This points towards red on the colour wheel, you can use it to create highly vivid purples.
- This is close to primary cyan, but mixes with lemon yellow to make high chroma greens.
- This is a clear, transparent yellow with high tinting strength.
- A deep opaque yellow with warm undertones
Create values (light or dark)
- Titanium white is completely opaque, but it can make mixtures appear chalky.
- Zinc is a translucent pigment. Use this pigment to maintain the saturation of your mixes—it doesn’t give the ‘washed out’ effect that titanium white can. Over use of zinc in mixes can create a brittle paint film, however.
Many artists use burnt umber instead of ivory black to create shade. Ivory black can make your colours look dull, desaturated and grey. Whereas burnt umber is transparent and warm in tone, so it can be used to create clean colour graduations.
Of course, a split primary palette won’t suit everyone. Some artists will want to use extra colours in their practice, pigments that provide different working properties. Other artists will want to limit their palette even more to give the appearance of organisation and harmony in their work. It’s up to you to choose a palette that suits. This split palette is a good starting point, however, for a beginner learning to mix.
9. Learn some of the basic approaches, techniques and methods in oil painting
There are different approaches and techniques in oil painting that can transform the way you use the medium and help you create special effects. Below I’ll outline a couple of examples. To understand the range of techniques used in oil painting, refer to our oil painting for beginners: techniques guide.
Alla Prima

Alla prima is the technique of painting wet-on-wet. Colours are applied spontaneously usually within one painting session. The aim of this technique is to finish the painting before the first application of paint dries.
Impressionists widely used this technique. They would often use vibrant contrasting colours to create the appearance of light, and gestural brush strokes to evoke a feeling of movement.
Impasto

Another interesting technique to experiment with is impasto. It is defined by the application of thick paint with either a stiff brush or palette knife to create texture. It can create an incredibly expressive effect. You can use an impasto medium to thicken paint to achieve this effect.
How to start an oil painting
There are several techniques artists use to start paintings. To maximise the accuracy of the final piece, begin with a drawing using the grid method. Or to establish the composition and values of an oil painting in the first stage, start with an underpainting. Discover five methods to starting an oil painting in our guide.
10. Varnish your paintings
Sealing a painting with a coat of varnish yields many benefits.
Varnish will protect your painting, from normal wear and tear and UV rays that can make it fade. More than that, a layer of varnish will enhance your painting, deepening contrasts and colours, making them pop.
There are several different options when it comes to choosing a varnish, I go into more detail about them in this varnishing guide. However, I advise getting a synthetic varnish (Gamvar).
Gamvar differs from traditional varnish like Damar Resin in that it allows the oil to cure beneath the layer of varnish.
If you were using traditional varnish, you would have to wait for the oil to cure before applying it. This could take anywhere from a couple of months to a year depending on how thick the paint has been applied. For artists working to deadlines, that waiting time just isn’t practical. However, there is the option of applying retouch varnish as a temporary measure when the painting has dried to the touch, to pretec the painting from UV and dust as it cures, before applying damar resin.
You can apply Gamvar as soon as your painting is dry to the touch. If you have thick textured areas of the painting, make sure the paint is hard all the way throug. Test it by pressing your fingernail lightly into the thick paint.
Applying the varnish is easy—make sure all your materials are clean and paint it on with a fairly soft, wide synthetic brush. Don’t apply too much varnish in one coat. A very thin, evenly spread coat of varnish will deepen colours and protect your painting. The varnish can take around 24 hours to dry. I’d advise propping it up on an easel and covering it with something to protect it from dust while it’s drying. You can always add another coat of varnish once the first has dried.
11. Store your paintings like a pro
As your skills progress, you may become more interested in the longevity of your work.
Oil paintings should be stored in temperate environments, that are light but not blindingly so. Oil paint is not resistant to UV light, unless it has been varnished correctly, so exposure to ultra bright sun light can make colours fade over time. On the flip side, linseed oil has a tendency to go murky if it is left to cure in the dark. There shouldn’t be too much humidity in the air, but also not too dry. Changes and extremities in heat and moisture can cause the surface of a painting to warp, leading to adverse effects on the paint, such as cracking.
From this advice, it sounds like oil paintings are high maintenance, but really they are not. The best storage tip is to find a good balance. The likelihood is that a room that you would find comfortable to be in for some time, your oil painting will like too. Problems would only arise if for example, you live in a cold wet country, or a hot humid country and you stored the paintings in your garage.
If you are getting ready to display your paintings in a gallery or for a show, put them in some bright light just beforehand. This will brighten up the colours and make them appear more vivid.
12. Keep in mind that art is something you can sell!
It might be too early to think about making your artwork saleable when you’re still figuring out how to use your oil paint. But it’s exciting to think that one day you could have your own collectors and buyers. A pastime you love could be converted into something really profitable if you want it to.
Being an artist can be a great way to make some extra cash, or it could even eventually be a feasible career choice.
With a social media presence and website you could have instant access to a global market. Of course, it’s not as straightforward as that but I’m illustrating the potential.
If you think that selling is something you would be interested in once you’ve developed your skills as an artist, save this tutorial for later: how to sell your art online.
It shows you how to set up your own website to display and sell your art. Plus it gives some extra tips on how to get it seen by potential buyers.
You can also sell prints of the original paintings by using a print on demand service, or taking the operation into your own hands. This is a great option if you want to offer your collectors art at a cheaper price.
13. Get some oil painting ideas
Spend some time learning the fundamentals of oil painting, then put your skills to practice. Find some easy oil painting ideas in our guide and learn to create oil landscape sketches, mountain scenes, portraits and still life set ups. Or check out our YouTube channel and learn how to paint an ocean. Before you know it, you will be developing your own art style and creating unique works of art to be proud of.
Oil painting for beginners: Pin it!
If you’ve found anything on this site especially useful, you can make a donation to me through PayPal. I take a lot of time to research and write each topic, making sure each tutorial is as detailed as possible and I make all my content freely available. Any small donation (even the price of a cup of coffee!) can help me to cover the running costs of the site. Any help from my readers is much appreciated :).
Follow the link in the button below to support this site.