
Painting en plein air (outdoors) is an invigorating experience. Regardless of which medium you are using, the concept is the same. To capture the light of a scene, before it changes and gets dark.
The atmosphere you can achieve in a painting by observing the landscape in front of you is incomparable. You’ll soak up the elements of the scene and your instantaneous reactions to what is there will translate onto your canvas. Not just the sight of it, but the feel you get from it—like how the breeze moves the grass, the luminosity of the sky, or the smell of wildflowers. These elements can lead you to make different artistic choices than you normally might in the studio.
The extra sensory input can help you to transport your viewer with your painting. So that they too can experience the scene you have painted. Once you try it a few times you’ll realise that painting from a photograph won’t give you the same results.
Disclaimer: Fine Art Tutorials is a reader supported site. When you make purchases through links on this site, we may earn a small commission at no extra cost to you.
Tip 1: Adapt your techniques for plein air painting
If you already paint quickly and alla prima (wet on wet) you should have no problem laying down the paint to capture it effectively.
However, most artists paint more slowly, spending days at a time on one painting. Unless you are planning on taking your field easel and setting up at the same time each day, with the same weather conditions, you need to work quickly to capture the scene.
Of course, some artists do set up their easel day after day until their piece is finished—but there is a problem with doing that—even if you are looking at the same landmarks and subjects, the scene will look totally different every day. The sky will change, the light will be playing on different areas of the land and the weather will be doing different things.
Many artists instead work more quickly than they usually do, painting wet-on-wet and with more spontaneous strokes.
In the 18th century, painters such as Monet began painting in an impressionistic style, which allowed them to cover ground on their canvas fast, before their scene changed.
Of course, many artists will maintain their painting style despite the location they paint in. You can always start an artwork outside and finish it at home later. If you paint outdoors with watercolour, check out our plein air watercolour painting guide.
Tip 2: Get the right tools for the job
Viewfinder

Artists’ View Catcher: Buy here.
One of the biggest challenges if you’re new to plein air painting, is looking at a scene and isolating the area that you want to paint.
If you are more used to using a photo as a reference, the scene you’re taking reference from is enclosed and the relationship between each subject and object is much clearer.
From a visuospatial perspective, unless you have immense focussing skills, it’s hard to block out all the other elements that feed into your vision in the periphery. It takes a well-practised eye to tune it all out. If you’ve not yet trained your eyes to do this, get a viewfinder to help.
Field easel
Sienna Plein Air Artist Pochade Box:
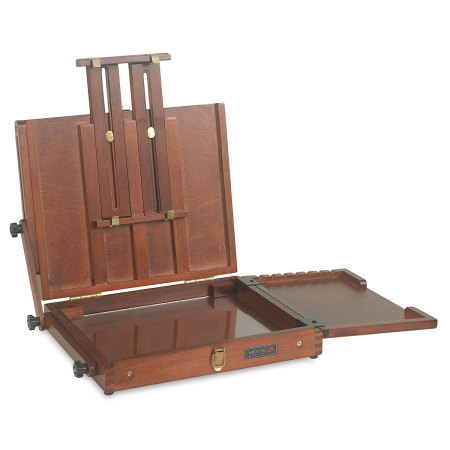
This beautifully made pochade box is fully transportable, has a tempered glass palette insert and a removable brush tray. Attach to a tripod and take on your next painting adventure. The maximum canvas size the medium box can hold is 15″.
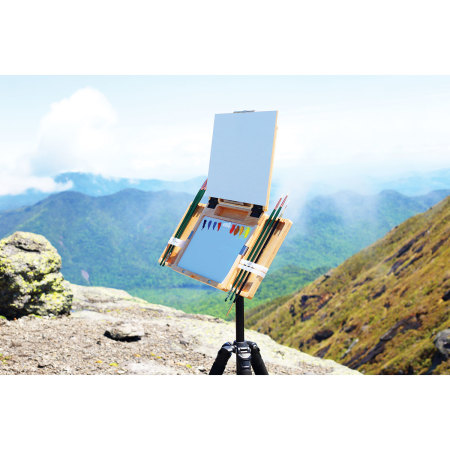
Durable and lightweight, this field easel is made from baltic birch and aluminium. It comes with 1/4″ tripod mounts and includes a neutral palette for mixing.
Check out our review of the best plein air easels for a look more options.
Tip 3: Limit your colours
Paint tubes can make the load you have to carry much heavier. Every artist’s palette is personal to them, but if you haven’t tried it yet, consider looking in to using a limited palette.
This essentially involves using a form of yellow, red and blue (the primaries) to give you the greatest chromatic range suitable for painting your subject. With the primaries, you will be able to mix secondary, tertiary colours and most tonal variations.
Depending which type of red, yellow and blue you choose, there will be some tonal variations that will be omitted from your palette, that you won’t be able to achieve just by mixing the three primary colour variations you have chosen.
In paint form, the closest colours to true primaries, that allow you to achieve the widest chromatic range with the fewest colours are:
- Magenta (It’s cool in its purest form, but mixes with yellow to make vibrant oranges).
- Cyan (this is primary cyan, the pigment is phthalocyanine. In mixes it can make vibrant greens).
- Transparent Yellow (A primary yellow: use this for clean bright mixes.)
To create tints and shades:
- Titanium White (this is the most opaque of all whites and therefore has a great covering power).
- Burnt Umber (natural dark brown earth pigment that can be used to create shadows).
For a fuller palette, consider getting a warm or cool version of each colour:
- Cadmium Red Light (this has a bias towards yellow). This colour can be substituted for Pyrrole Red.
- Ultramarine Blue (reddish undertones, to be mixed to make bright purples or neutral greens).
- Cadmium Yellow (a rounded, deeper yellow with reddish undertones). Substitute this for Hansa Yellow if you want a cheaper alternative.
Of course, the colours you choose will depend upon your style of painting and also the landscapes, flora and fauna of where you plan to paint. For example, if you want to paint a spring bloom of cherry blossoms, you might take magenta, titanium white and burnt umber with you.
If you want to paint the red rocks of Moab, Utah, you might pack Burnt Sienna or Red Ochre.
Tip 4: Prepare your surface
It seems obvious, but make sure your canvas has been primed and is ready to work on. If you like to work on a toned ground, paint that first and wait for it to dry. Prepare as much as you can first to make yourself feel comfortable in the field.
Alternatively, you could get some pre-primed surfaces to save yourself some time, like Ampersand’s Gessobord.
Tip 5: Prepare yourself
There are tools you can get to shield you from the elements while you’re working.
I live in the UK, so it rains most of the year. Whenever I go out painting for hours on end, I pack a rain jacket just in case and put all my supplies in a waterproof backpack.
You can also get special easel umbrellas to shield you from rain and intense sunshine. They work by clamping to your easel and are big enough to protect you, your painting and supplies.
Painting in direct sunlight is actually really tricky. You could encounter problems like surface glare from a white canvas and oil. Or not being able to see the landscape in front of you without squinting from the sun. I don’t advise wearing sunglasses to paint if you want to represent the colours realistically as they can distort the light. An umbrella will shield your eyes from the sun so you can clearly see your subject, it will also keep your flammable substances such as solvent out of the heat. Another way to combat surface glare from your canvas is to paint an imprimatura first.
Tip 6: Block in colours when the light is perfect
If you want to establish a composition to represent your scene when the light is just right, you could try the technique of blocking in.
You can do this quickly and roughly, painting the basic shapes and colours in the first paint layer. That way, it makes it easier to determine the position and colour of details later on, even if the light changes.
Tip 7: Photograph your scene to work from it later
This isn’t cheating, by the way. If you’re an artist who won’t get a painting finished over the course of one session, take a photo when the light is just right. Then if you don’t finish it plein air, you can take it back to the studio to perfect the details.
The most important thing is that you experience working outdoors and get a feel for the scene. Translate light and depth you see from a landscape in front of you, rather than working just from a photograph. The resulting painting will look much different to scenes where you’ve only used a photograph as a reference.
Tip 8: Stay clean in the field
If you’re a neat freak like me, you probably want to know what the logistics are about transporting things like solvent and paint waste. Take some ziplock bags with you, so you can wipe your unused paint in tissue paper and keep airtight before disposing of. Get a container for your solvent and separate containers for other mediums.
I don’t take solvent with me when I paint plein air. I take a small jar of safflower oil to remove paint from the brush when I’m changing colours. Then I wait until I get home to clean brushes properly.
By limiting your mediums and materials the whole process will feel a lot more spontaneous, just like the changing light!
Tip 9: How to travel with a wet canvas or panel
If you’re painting with a fast drying medium, packing your painting for travel won’t be a problem. You can find various folders or plastic wallets to store your artwork in. If your medium of choice is oil, the painting will be wet when you transport it. So you want to make sure it doesn’t smudge en route.
Of course, there are various specially made boxes you can buy to safely get your wet painting from A to B, like this one made by Guerrilla. Richeson make a great wet panel box, that fits 9×12″ and 8×10″ panels. Some field easels will have sections that you can store paintings in too.
These panel boxes are great. Use them for transporting panels outdoors and to and from art class if you go to one.
Plein air painting: Pin it!
If you’ve found anything on this site especially useful, you can make a donation to me through PayPal. I take a lot of time to research and write each topic, making sure each tutorial is as detailed as possible and I make all my content freely available. Any small donation (even the price of a cup of coffee!) can help me to cover the running costs of the site. Any help from my readers is much appreciated :).
Follow the link in the button below to support this site.