
Artists use atmospheric perspective to create the illusion of distance between the viewer and objects in a painting. Colour and values are used in such a way to make it appear as if subjects and objects are receding into the distance. The effect is used in landscapes, cityscape paintings and figure scenes that are set outdoors.
In this guide, learn what atmospheric perspective is and how to use it to create realistic looking landscape paintings.
Disclaimer: Fine Art Tutorials is a reader supported site. When you make purchases through links on this site, we may earn a small commission at no extra cost to you.
Atmospheric perspective definition
Atmospheric perspective describes how the properties of the atmosphere alter the appearance of distant objects.
The reason why objects appear different further away compared to close up, is due to the effect of blue light waves scattering and being reflected in the atmosphere. Blue light is high frequency and is therefore more likely to be reflected by molecules and particles in the air. From the viewer’s perspective, a distant object that appears more blue in tone is actually the blue light being reflected from the air in front of that object. This in turn reduces the clarity of the distant objects.
Several visual attributes of an object are lost to the particles and molecules that inhabit the space between the viewer and the object, that is: value contrast, colour contrast, colour, detail.

On foggy or misty days, or when there’s smoke and other particulates in the atmosphere, distant objects are even harder to see. This is because light is reflected even more by larger particles in water vapour and smoke. The vapour and smoke will reflect even more of the blue light in the atmosphere, so objects will appear to recede at less of a distance.
Depending on the conditions, distant objects can look quite different. For example, on an especially clear, bright day, if the sun is shining directly on the distant object, the object will reflect the light and appear brighter. At sunset, distant hills and mountains take on a warmer hue.
These are all factors that artists must take into consideration when rendering their scene. As ultimately, this will give important information to the viewer about the location and conditions of the subject of the artwork.
Representing atmospheric perspective in art: Contrast and colour
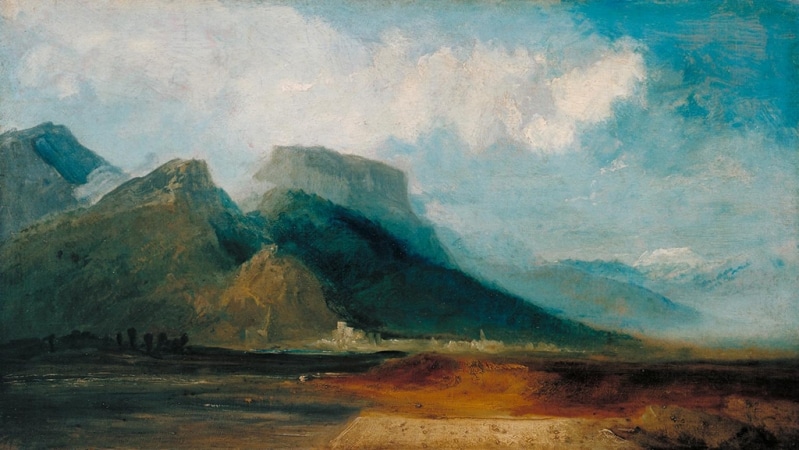
Artists represent atmospheric perspective in a few ways. Objects that they want to appear more distant will lean more towards blue on the colour wheel than similar objects in the foreground. These objects will also be closer in value to the sky, compared to objects in the foreground.
This means that subjects or objects in the distance will appear lighter and cooler in tone than objects in the foreground. These distant objects will also appear less contrasted and less detailed. The contrast between both colour and values in the object decreases and the edges around the object appear softer.
Contrary to this, objects in the foreground will have a much higher contrast between light and dark tones, they will appear much more saturated, with more details, sharper edges and warmer tones.
How to use atmospheric perspective in art
There are a few methods and techniques artists can use to create the appearance of atmospheric perspective.
One really important step that is sometimes overlooked, is planning the composition of the artwork. By planning how different elements in your piece fit together, in terms of the colours, values and spatial arrangement, you can create focal points, a sense of movement and lead the viewer’s eye in.
Plan the composition

To plan how different elements relate to one another and to create a more aesthetically pleasing piece, start by planning the composition in a sketchbook. Make a few different thumbnail sketches, arranging where the focal point will be. Be sure to leave space between elements and place the focal point close to the viewer.
Linear perspective composition
To create the appearance of perspective in a composition, place elements that you plan to recede into the distance closer to the horizon line. Of course these elements will look smaller the closer they are to the horizon line too. If you’re drawing a cityscape, or any buildings, you may want to use linear perspective techniques to ensure that your drawing is accurate.
Atmospheric perspective composition

The final step, when creating the appearance of depth and distance in an artwork is to create the appearance of atmospheric perspective. To do this, you could analyse your reference and make colour and value studies from it. A great way of see the values in a reference photo more clearly, is to put the photo in black and white. This way, you can see the relative values in greyscale, without the colours obscuring the values in the image. Use this to inform you about the relative lightness and darkness of the sky, distant objects and foreground objects. Distant objects should be paler than objects in the foreground (if your painting is set in the day time) and objects in the foreground will have a higher contrast between light and dark values.
Take some colour swatches when planning the composition of the colours of the foreground objects, mid ground, distant objects and sky. From this, you can see the complete value range, where the darkest colours and lightest colours sit, where the most muted and saturated colours go. You don’t have to do that much preparation to start a painting, but if you’re working on a final piece that you want to appear realistic, the more effort you put into designing the composition, the better the results!
Colour mixing

When mixing colours for the foreground, you can mix bright highlights, dark shadows and saturated elements. Use your full colour palette to make these mixes, using warm toned pigments such as cadmium red or burnt umber. To create the darkest shadows in the foreground, mix burnt umber and ultramarine to make black.
With far away objects, your palette should mostly consist of cooler pigments and white. A great tip is to mix some of the colours you will be using for the foreground with some of the sky mix. This way the mountain colours become closer in tone to the sky colours.
Control the edges of the object
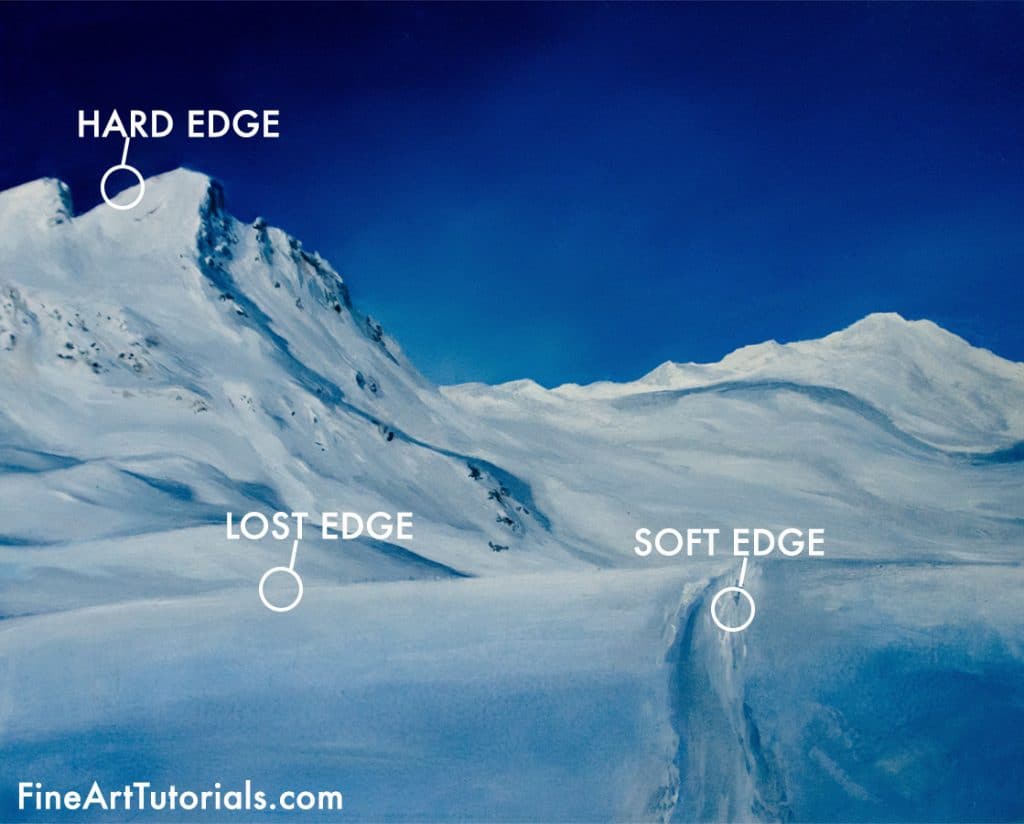
Objects in the distance appear more blurred and their edges blend into the sky. Make sure to focus on edges when painting, especially if you want to achieve a realistic look to your artwork. The edges around distant mountains will appear soft and blur into the sky, whereas edges of foreground mountains will look sharp, hard and easy to distinguish.
Use the blending technique
The blending technique is a great one for creating soft edges. This technique works with oil paint, acrylic paint or coloured pencils. To blend with oil or acrylic paint, paint wet on wet, so that the layers of the painting you want to blend together are both fully workable. Then get a clean soft brush and start blending the two together. Careful not to overdo the blending, as this can make the edges you want to blend together disappear altogether!
Colour pencil blending is also simple. Get a tortillion and rub it gently across the edge of the colour you want to soften.
Paint more loosely
The further away the objects are in your drawing, you should paint them more loosely. You don’t need to make detailed strokes with a brush when painting distant buildings or trees. Instead, just use broad brushstrokes that follow the natural contours of the object being painted. Make sure to blend gently into other colour areas to soften edges.
Atmospheric perspective and art history

Atmospheric perspective has been used in art for thousands of years. Evidence of one of the first instances of atmospheric perspective in an artwork is the fresco at the Villa of Livia, near Rome in Italy which was created in 39 BC.
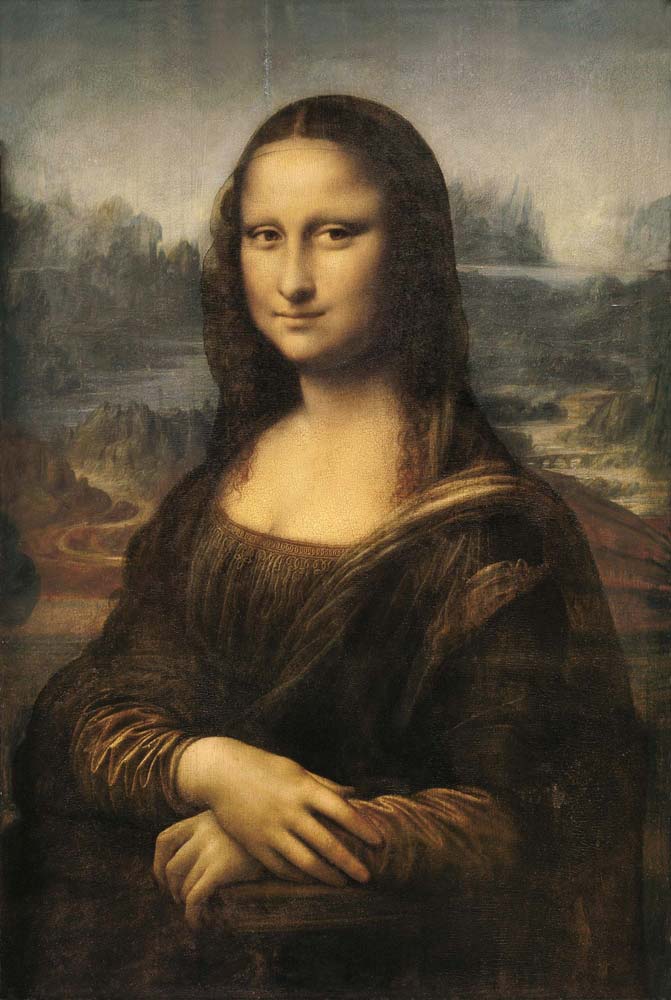
Renaissance artists such as da Vinci used linear perspective and atmospheric perspective to make his paintings appear more three dimensional and give them depth. In the portrait The Mona Lisa, the distant mountains fade into the sky. Da Vinci was interested in the field of optics and aimed to create a more naturalistic and realistic style.
Painting fog and smoke

To depict fog or smoke in a scene, use atmospheric perspective techniques to create the illusion of depth. This may involve using cooler, lighter tones and less contrast within the object itself, compared to objects in the foreground. Fog reflects a large amount of light, which veils objects that are closer to the viewer.
To paint fog or smoke, paint objects that are perceived to be closer in terms of their size, as paler, cooler in tone and less detailed. Objects on the horizon may be completely covered my the fog.
Painting atmospheric perspective at sunset

The rules for painting sunset are a little different to painting day time scenes. Against a bright red, orange or pink sky, distant objects will appear warmer and lighter in tone. So mix yellow or red with the colours of the foreground objects to create far away trees, mountains or hills. However, objects can sometimes appear darker in tone compared to foreground subjects and objects. This occurs when the sun is low in the sky and is setting behind the subject in question. This blocks the light and creates a silhouette effect. These objects will never be black, however. Make sure to study your reference and describe the colours before mixing the colours for the painting.