
If you’re an artist, then you know that the quality of your work can depend on the quality of your materials and your surface. In this step-by-step guide, we will show you all the supplies you need to make a canvas and how to stretch a canvas onto a frame. Not only is this process easy and affordable, but it also allows you to customize the size and shape of your canvas.
So, whether you’re an experienced artist or just getting started, follow these steps to make your perfect custom surface and stretch your own canvas!
Disclaimer: Fine Art Tutorials is a reader supported site. When you make purchases through links on this site, we may earn a small commission at no extra cost to you.
How to stretch a canvas: step-by-step guide
Now that you have all of the supplies, it’s time to start stretching your canvas!
Cut the wooden stretcher bar
Measure and cut the stretcher bars to size, using a saw or miter box. If you’re making your own stretcher bars, make sure they are the same width and thickness. The corners of the stretcher bars should be cut at a 45 degree angle to form a miter joint.
Skip this step if you have bought stretcher bars, as these will be ready to slot together.
Assemble stretcher bars

If you have made your own stretcher bars, you can assemble them with your industrial strength glue and clamp together to secure in place.
For those that have bought stretcher bars, simply slot the notched ends together of the first two bars. Push with your hands until both sides are flush. The bars should form a diagonal line where each bar meets. To ensure that they are secure, get a hammer and gently tap at the join.
Cut the canvas

Cut a square or rectangle from the canvas roll. You should account for an extra 20-30cm on top of the canvas measurements to accommodate for the bar.
Spread the cut canvas out onto a large, clean surface such as a table or workbench. If the canvas is primed already, make sure that the primed side is face down on the table.
Place the stretcher bars down

Place the canvas frame in the centre of your cut canvas section. Make sure that the flat side of the stretcher bars are facing upwards. The weave of the canvas should align with the direction of the stretcher bars.
Stretch the canvas

Starting on one of the sides, take hold of the canvas and pull it taut over the frame and around to the back. The fabric should have no wrinkles or slack. If the canvas is completely tight, use a staple gun, with one staple in the centre of the stretcher bar.
Do the same for the opposite side and then both top and bottom, placing one staple in the centre of each side. Make sure to use the canvas pliers after you’ve secured the first side, to ensure you’re using enough tension to stretch the canvas around the frame. After you’ve stapled one on each side, you can work from the centre of each bar to the corners.
Leave around 5-10cm between each staple, depending on the size of the canvas. There should be adequate room near the corners of the stretcher bars so that you can fold the corners of the canvas. Leave around 10-20cm depending on how large your canvas is.

When using unprimed canvas, the trick is not to pull the material too tightly, as the priming process can cause the material to shrink slightly.
Fold the corners
When you’ve finished stapling the canvas, fold the excess material at each corner. Hold your finger on the corner where the two stretcher bars meet, the material should form a v shape. Fold the material underneath where it overlaps. Make sure the crease is tight before securing. Watch the video for a clearer look at the folding technique in action. This is the trickiest part of the framing process, so practice a few times until you get the knack for it.
Trim the canvas
Trim any excess canvas with sharp scissors or a utility knife. Use a straight edge to ensure that the cuts are even. Make sure not to cut too close to the staples, incase you need to remove them again to adjust the fabric.
Your stretcher bars and canvas are now ready to be primed and painted!
Prime and prepare the canvas for painting
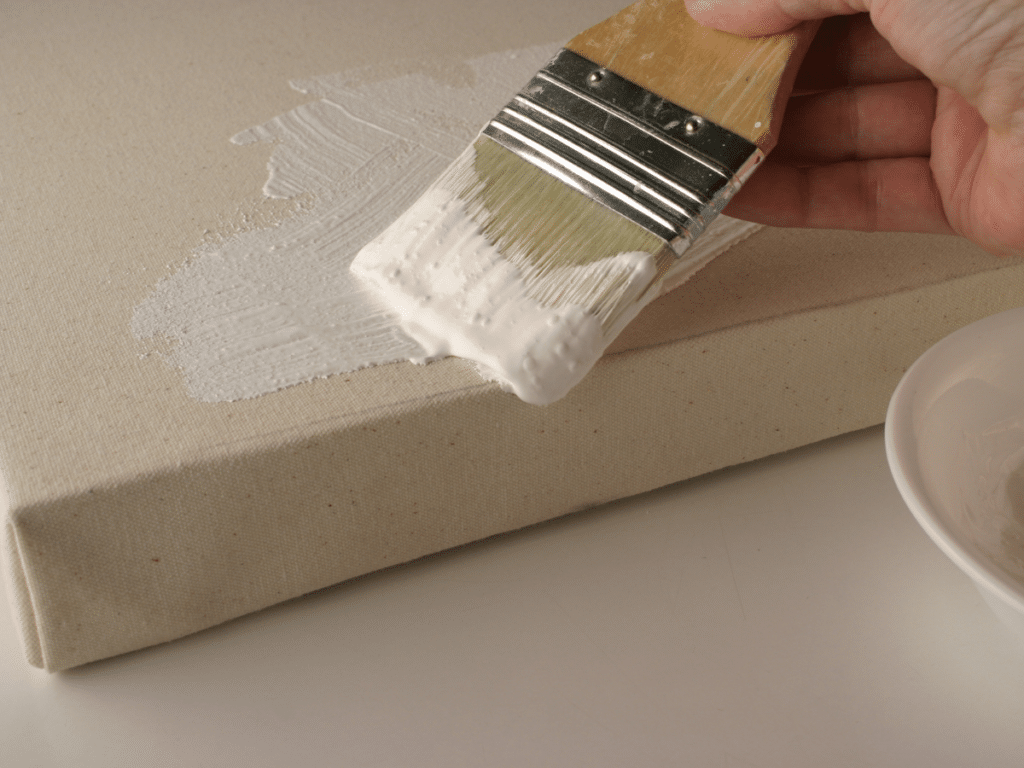
If you’re using an unprimed canvas, then it’s important to prime the surface before painting. This will help to prevent the paint from seeping through the canvas and ruining your work. There are many types of primers on the market, so choose one that is best suited for your needs. Use a sealant like GAC-100, then after that has dried, apply a few coats of gesso. In our guide on how to prime a surface for oil and acrylic painting, we go into more detail.
Once the primer has dried completely, you’re ready to start painting. Experiment with different techniques and colours to create your masterpiece!
What supplies do you need to stretch a canvas?
Supplies to make your own canvas can be found in art stores or hardware stores. The great thing is, that you can buy materials in bulk, saving money in the long run.
Canvas

The first and most essential material you will need to stretch a canvas, is of course, canvas! For beginners we recommend using a belgian linen canvas or cotton duck. Both of these types of canvas are relatively easy to work with and don’t require any special preparation before stretching.
Belgian linen is a higher quality canvas and less likely to warp, but it will be more expensive. Cotton duck is a lower quality canvas, but it’s also much cheaper and the most commonly used type of canvas by artists.
This linen canvas is a dream for professional artists. It has a tight weave and a smooth texture that enables painters to create fine details and smooth blends. It also comes in double weave varieties for extra strength.
A slightly more affordable option is this unprimed cotton canvas. It’s excellent quality and comes in a range of weights and textures. Cotton is more flexible compared to linen, so it will be slightly easier to work with when stretching the canvas around the frame. The heavyweight variety has a visible surface texture, is more durable and accommodating of thicker and heavier paint applications. For 1yd of this cotton canvas, expect to pay around $22, although this product is often on offer, so check the link for prices.
Stretcher bars

Buy stretcher bars
The next thing you will need is stretcher bars.
Choose the sizes of each stretcher bar, to create your custom sized canvas.
These stretcher bars are heavy duty and have a profile of 1-1/2″ with a 2″ width. The kiln dried pine wood they are made from makes these extra durable. The rounded edge and 1/2″ rise ensures that the canvas will not sag.
Alternatively, you could cut four wooden pieces to size and build the frame. However, most artists will buy stretcher bars as they are easier to assemble.
Cross braces

This is essential if you’re making an extra large canvas, above 36″.
The cross braces help improve the stability of the canvas. You can buy these as a set, or make your own using wooden bars. Attach cross braces to the stretcher bars with cross brace brackets.
When getting a pre-made stretcher bar, order the size of your canvas. The stretcher bar will be smaller than the canvas frame, but fit snugly against it.
Corners
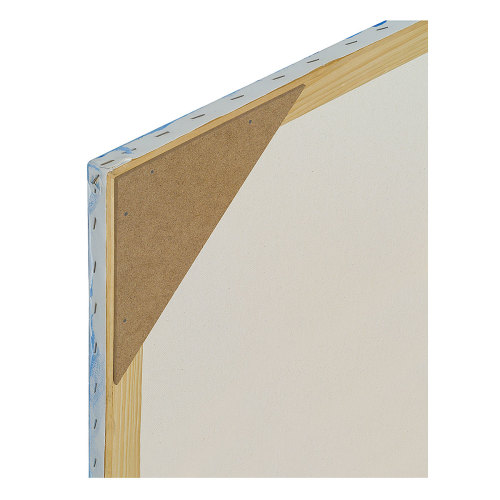
Hardboard corners provide a strong and secure corner for the canvas. They are easy to attach and help to keep the canvas tight on the stretcher bars and maintain a square shape. However, these are an optional extra.
They are inexpensive and are cut to a perfect 90° angle, with holes for mounting. Or you can make your own right angle triangle corners out of board to support the canvas.
Tools for cutting your canvas stretcher bars
If you’re going down the route of cutting your own stretcher bars, you will need a saw and miter box to make the 45° cuts. If you have bought pre-made stretcher bars, you won’t need these tools.
Hammer
A hammer is essential to ensure canvas bars are fitted properly and sit flush with one another.
Framing glue
You may also need a good quality framing glue, like Titebond III. This is a water based wood glue that is non-toxic, easy to use and dries clear. You’ll only need this if you’re sawing your own frame. Framing glue isn’t necessary if you’ve bought stretcher bars with notches that can be slotted together.
Staple gun
A staple gun is the best way to secure the canvas to the stretcher bars. You can buy a heavy duty staple gun, like this one. It has an easy squeeze design and staples load quickly into the bottom.
Canvas pliers
Canvas pliers are a specially designed tool to help with the stretching of canvas. They have a non-slip grip and jaws that open wide to easily fit around the canvas.
Measuring tape
Get a measuring tape to ensure your stretcher bars are the correct size and to cut the canvas accurately
Scissors
Get a sharp pair of scissors to cut your canvas to size. Alternatively you could use a utility knife and a straightedge to guide your cut.
What are the advantages of stretching a canvas?
When deciding whether or not to stretch your own canvas, there are a few advantages to consider. Firstly, it’s cheaper than buying a pre-stretched canvas if you have some of the tools to hand and if you’re planning on making them in volume. You also have more control over dimensions of the canvas, which can be important if you’re looking for a specific fit or size.
Additionally, you can choose the type of fabric you use to customise your perfect surface. The last thing is that you have control over the primer used. For example, if you want to avoid using animal products for sizing, you can use GAC-100. Michael Harding’s non-absorbent primer is high quality and makes colours look more luminous on the surface. If you make your own canvas from scratch, you can prepare the canvases with higher quality products than canvas manufacturers at a cheaper cost. The last advantage is, in the joy of learning a new skills and owning the full process, from putting the canvas together to the final layer of varnish.
The best stretched canvases
If the reason for you embarking on a canvas making journey is that you’ve not found your perfect pre-made canvas match yet, we have some product recommendations of quality canvases that many beginner and professional artists love to use as surface supports. Check our oil painting surface and acrylic painting surface and best painting canvas guides for a more in depth review.
Museo Alu-Frame Claessens Belgian Linen Canvas
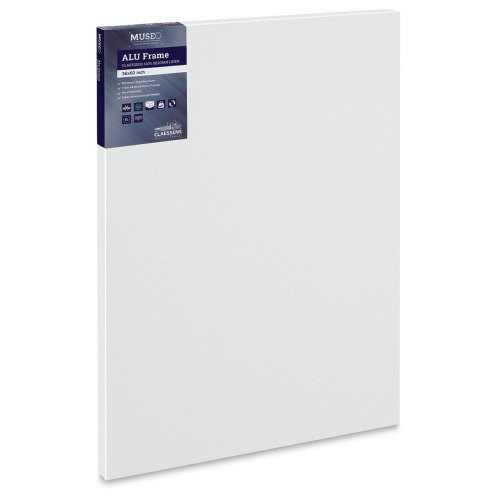
Buy Claessens Belgian Linen Canvas
This is the highest quality, archival, museum standard canvas. It’s expertly crafted and made from claessens Belgian linen. It’s hand stretched around aluminium stretcher bars, which prevents warping. Although this option is pricey, painting on this surface will ensure that your artwork will stand the test of time.
Fredrix Pro Series Dixie Cotton Canvas
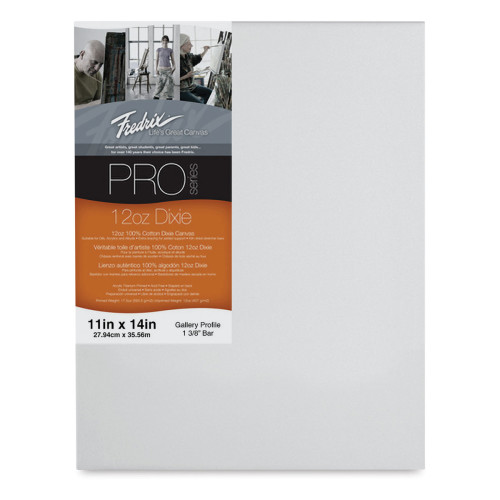
Buy Fredrix Pro Dixie Cotton canvas
This is a cotton duck canvas, it’s also double primed and acid-free. It’s an affordable option used by professionals and beginners. There are two options to choose from, museum (deep) profile or gallery (slim) profile.
If you’ve found anything on this site especially useful, you can make a donation to me through PayPal. I take a lot of time to research and write each topic, making sure each tutorial is as detailed as possible and I make all my content freely available. Any small donation (even the price of a cup of coffee!) can help me to cover the running costs of the site. Any help from my readers is much appreciated :).
Follow the link in the button below to support this site.