
Natural daylight is often considered the best type of lighting for creating art. However, the quality of natural light is affected by the time of day and time of year. If you live far north, daylight in the winter months can be short and sometimes it feels like it never gets light! Warm light from sunsets or sunrise can obscure colours in an artwork.
You may also be in the situation where your studio lets in too much light, creating glare or reflections on the artwork. In this case you may need blinds in your studio and a couple of daylight lamps.
Finding an art studio lighting solution can help you live up to your full potential as an artist. Accurate portrayal of colour and value is one of the most important aspects of creating a successful art piece. With proper lighting set up, you will be able to colour match from a reference, determine accurate value transitions and discern between subtleties in skin tones to your full ability despite the time of day. With studio lights, you will likely see your colour mixing skills improve.
Disclaimer: Fine Art Tutorials is a reader supported site. When you make purchases through links on this site, we may earn a small commission at no extra cost to you.
How to choose lighting for artwork
There are two measurements of light that affect artists’ working conditions. The first is the colour rendering index (CRI). This refers to how the light illuminates colour. A CRI of 100 means that the full spectrum of colours will be illuminated. The sun has a CRI of 100 and bulbs with a CRI of between 80 and 100 will reveal the natural tones and hues of the artwork.
Another feature to look for in a daylight lamp for the studio is the correlated colour temperature (CCT), which indicates how warm or cool a light appears. A warm light will appear yellow, orange or red in tone, while a cool light will appear blue. The relative warmth or coolness of a light can significantly affect how the artwork appears, obscuring hues.

For example, a warm light can make blue tones in a painting appear neutral. The light temperature on a cloudy day is cool and the colour temperature of sunset and sunrise is very warm. The correlated colour temperature is measured in Kelvin and the colour temperature of midday sun is around 5500k. This is otherwise known as daylight balanced photographic film standard. Look for lights with this colour temperature and you will be able to see a full vibrant spectrum of colours in your artwork.

You will need adequate brightness and illumination, so the number of lights you will need to put in your studio depends on how dark your studio is and what time of day you prefer to paint. You may need several fixtures to illuminate the space to the point where colours appear clearer. It will be a case of getting one or two fixtures, then testing it to see if it is enough, then perhaps adding another light to the studio if need be.
Test the light in your studio

Before buying any lighting for your art space, test the lighting in your studio. Most spaces just need a few adjustments, possibly a change of bulb in the main light fitting to balance the colours to daylight photographic film standard and maybe one extra light to illuminate the space more.
Too much light is also bad—if you are experiencing glare, reflections or shadows on your paintings, the light may be too strong or it may be coming from the wrong directions. The options to rectify this will be getting blinds to cover up windows that are causing the glare or casting shadows. Another option is getting a soft box or light with a diffuser to prevent glare and reflections on the artwork.
Pay attention to the light and dark areas of the artwork. If the whites in a painting or drawing appear grey, then you need more light. If the dark areas appear too high key, then less light will be needed.
A good way to test the light in your studio is to take photos of the artwork at different times of the day at your workstation, then compare it to a photo of your artwork in a bright, midday light setting. If the light at the workstation is dramatically different throughout the day, it’s a sign to get some studio lights.
Light an art studio on a budget
The cheapest way to light an art studio is to find bulbs with a high CRI index and CCT of around 5500k to replace existing lights you already have. You can find colour balanced fixtures for tube lighting, lamps and almost any other light fixture you may have at hardware stores. Just make sure to pay attention to the CCT and CRI numbers. These lightbulbs are CRI 80+ and a CCT of 5000k.
The best lighting for artwork: Lamps and lights reviewed
Chromalux Light With Stand
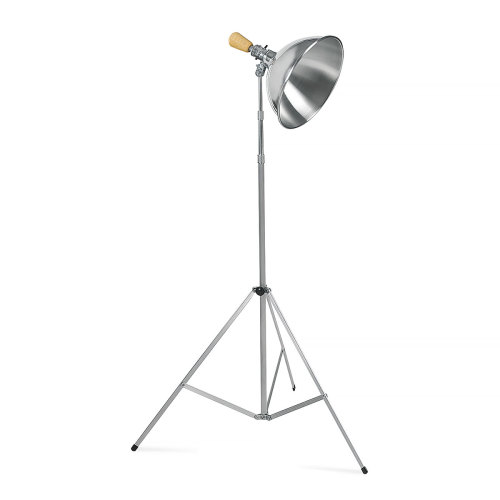
This studio lamp has a beautiful brushed chrome finish and comes on a large sturdy tripod stand. The light has a wide glow and comes with an ultra bright reflector shade. This spreads the light across a large area, making it ideal for working on large paintings. It has an LED bulb that produces low energy and little to no heat. The lamp has daylight technology which provides true colour matching abilities. It also has the benefit of reducing eye strain whilst working.
Daylight Lighting Slimline Table Lamp
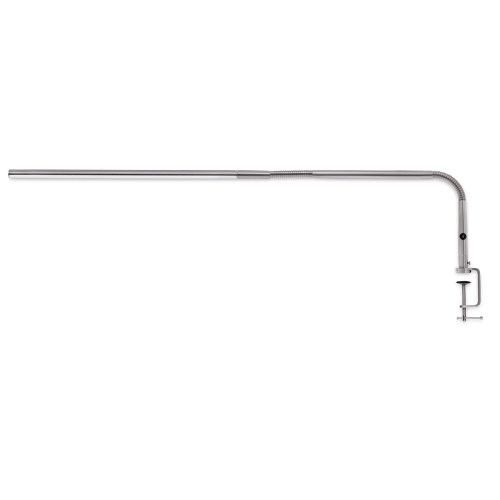
This slimline lamp attaches to a table or desk with a clamp fitting. The Daylight Table Lamp is a great option for pencil artists or anyone that works flat or tilted at an angle. It has flexible joints so you can point it where you are working. The light comes with a full length diffuser, that evenly spreads light to reduce eye strain and reveal the true value of colours. With a CRI of 80+ and colour temperature of 6000k, colours will appear true to life.
Best lighting for filming and photographing art for print

Do you create videos for social media? There are some light options available for videographers. Get a couple of soft lights, like these Savage 700 Watt Studio lights. This kit comes with two dimmable LED studio lights with translucent umbrellas to diffuse the light evenly. Set each of these lights up at a 45 degree angle to your artwork and enjoy the 5500k balanced remote controlled light. Another great use for these is photographing artwork for print.
How to set lights up in your studio

Think about the position and angle of the light. Lights from windows that are fairly low down compared to the easel can cast unwanted shadows. Skylight windows are often best at providing natural light at an angle that won’t cast unwanted shadows. However, most people don’t have these in their studios. Ceiling lights with balanced daylight bulbs over the easel will do fine. Place the easel so that it is in front of the ceiling light, the light should not be directly overhead or blocked.
If you need to supplement the light from the ceiling, set up some lamps. The lamps should be placed at the right distance from the artwork. Use the whites and darks in your artwork to determine if the lamps are too close. For optimum lighting, get two lamps and place each one at a 45 degree angle from the artwork with the light facing inwards. This will avoid awkward shadows being cast and reduce surface glare. If you work flat at a table, you may need to get table lamps that attach to the table and point them down towards the artwork.
Check out our studio supplies guide if you want to deck out your studio with some more gear, or find some organisation solutions for all your supplies.
If you’ve found anything on this site especially useful, you can make a donation to me through PayPal. I take a lot of time to research and write each topic, making sure each tutorial is as detailed as possible and I make all my content freely available. Any small donation (even the price of a cup of coffee!) can help me to cover the running costs of the site. Any help from my readers is much appreciated :).
Follow the link in the button below to support this site.