
How to blend coloured pencils: create seamless blends and gradients with these 5 easy methods.
Blend coloured pencil by layering, burnishing or by using a pencil medium. Artist grade coloured pencils are soft, made from either wax or oil and are therefore easy to blend. By using such techniques as layering and blending, artists can create realistic looking effects.
Thick, blended oil or wax pencil application can even emulate the effects of other mediums, like pastel or oil paint.
The materials you choose for your coloured pencil drawing are pretty important. As the paper, types of pencils and mediums you choose will affect the outcome of the drawing.
First, we’ll take a look at the kinds of materials that work best with the blending technique, then we’ll go through each blending method, so you can choose one that suits you best.
Disclaimer: Fine Art Tutorials is a reader supported site. When you make purchases through links on this site, we may earn a small commission at no extra cost to you.
Best coloured pencil supplies for blending

The best paper for coloured pencil drawing should be thick and rigid, with a slight tooth.
Papers like Clairefontaine Pastelmat are archival quality, acid-free and thick. The texture of Pastelmat feels velvety smooth but has adequate tooth to hold onto pigment, so artists can build thick applications of pencil.
The Faber-Castell Polychromos pencils are soft, made with an oil binder, highly pigmented and come in a large range of colours with excellent lightfast ratings. The lightfast ratings indicate the permanence of the pigment, meaning colours in artworks won’t fade over time.
Check out our review of colour pencil brands if you’re interested in learning about other artist grade coloured pencil options.
Use a fixative if you want to keep your blended colours in place to build separate layers on top.
A final fixative is necessary for all drawings, however using a fixative between layers isn’t necessary when working on Pastelmat.
Blend coloured pencil by layering
Layering is perhaps the easiest way to blend colours. It doesn’t require many materials—all you need is your pencils and paper.
Colours are blended by building layers on the paper. The more layers that are applied, the thicker and more blended the colours appear.
When layering colour, start by applying light pressure and slowly increase the pressure you apply to the pencil with each consecutive layer.
On grainy paper, it may take a few layers of colour before the texture of the paper is completely covered. After around three or four layers of colour, you will find yourself applying more pressure to the pencil and the colours will take on a smoother appearance, almost like pastel.
If you want to blend two colours together, start by lightly applying the lightest colour, hold your pencil at an angle as opposed to vertical to the paper, as this will preserve the pencil tip and give more even coverage. Then with the second colour, apply lightly, overlapping where you want the two colours blended. Take the lighter colour again and by applying slightly more pressure, go over where you first applied the colour and over the overlapped section. Repeat this action with the darker pencil. Continue layering like this until you have achieved your desired smoothness.
I use the layering blending technique in this butterfly drawing tutorial. I blend the light yellow over the mid orange tones, then deepen the tones with a darker orange.
How to blend coloured pencils by burnishing
Burnishing with coloured pencil is a blending technique, whereby colour is applied with heavy pressure. Hold your pencil at a slight angle and apply pressure. Shade back and forth until the colour appears smooth.
When using the layering technique, you will find yourself burnishing in the last layers of the drawing, as this is what gives the smoothest effect.
Burnishing occurs when pressure is applied to the pencil tip so that it releases the binder and pigment in thick lines, crushing the binder into previous layers of colours and into the tooth of the paper.
Pigments mix together on the surface. The results of burnishing are bright, smooth, rich colours that completely cover the paper surface.
There are several ways of blending by burnishing. The first way is simply by using the same coloured pencils as you’ve already used in previous layers of your drawing.
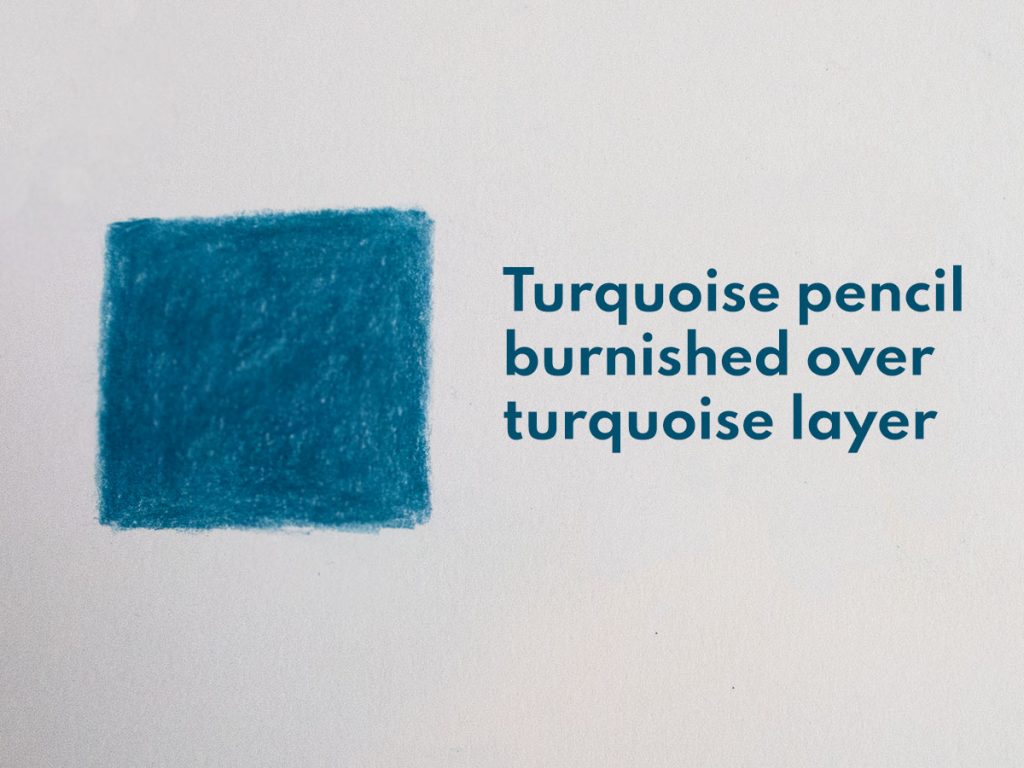
I carried out the burnishing technique in the square above. I started with a light layer of turquoise, then burnished over it applying heavy pressure with the same turquoise pencil.
This method is great for areas of colour you want to appear bright, intense and pure.
I’ll outline a few other burnishing methods below, using other colour pencil combinations.
How to blend coloured pencils: burnish with colourless blender
Burnishing with a colourless blender is really simple.
All you need is a wax colourless blender, like this one from Caran d’Ache.
This blender can be sharpened to the point of a pencil with sandpaper if you want to blend smaller areas of the drawing. Or you can leave the tip flat for blending larger areas.
Shade with the colourless blender over the layers of colour you’ve already applied. Press hard on the paper, it will create a separate colourless layer that will give a satin finish and a smooth appearance.
Other burnishing methods
Burnishing is a great blending technique that you can have a lot of fun with, trialing out different colour combinations. It works a bit like glazing, if you are familiar with that technique from oil painting. You use the transparency of the pencil to allow previous layers of colour to show through, whilst creating smooth blends.
Light over dark colour burnishing
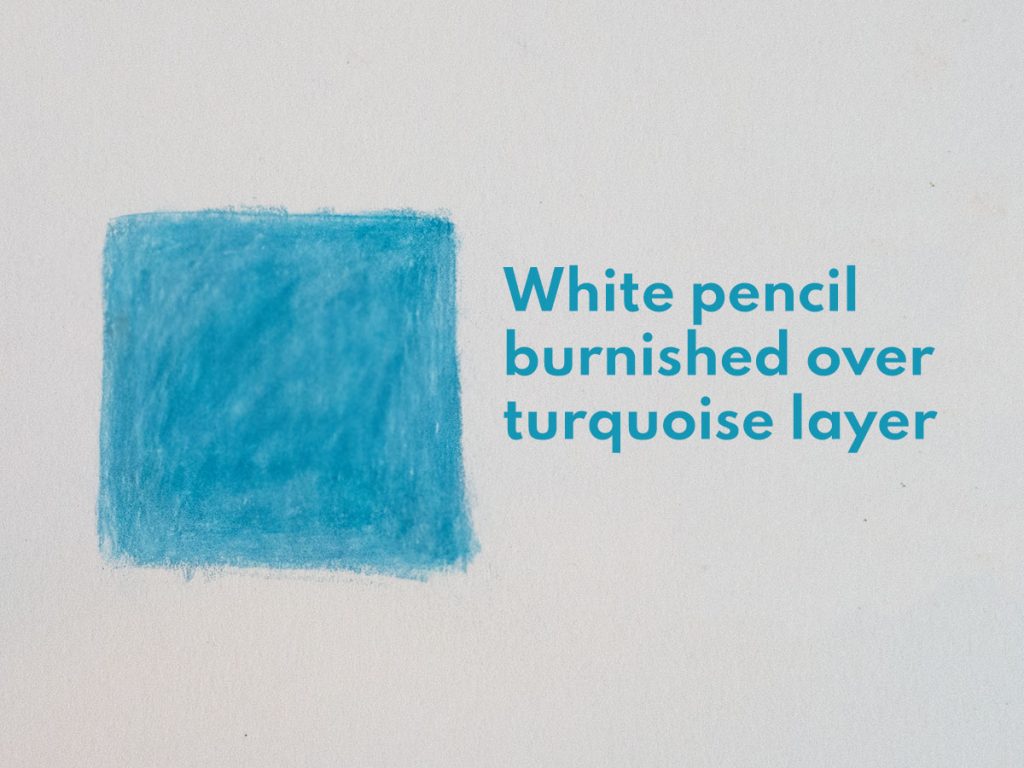
Blend colours by using a lighter or darker colour to burnish over the colours you’ve already worked into the paper. For the lightest effect, choose white. However, a white layer can sometimes make colours in previous layers appear milky or chalky, but if you want to achieve a high key look, this would be a good option.
Burnish with a different colour

Another method you could use is choosing a different colour to the ones already applied to subtly change the tones. Artist grade coloured pencils have a good level of transparency, so colours from previous layers will show through. For example, you could burnish over a drawing of a lake shaded in predominantly turquoise hues with a more purple toned blue, like ultramarine, to show coolness and depth.
In the above example, I used a yellow pencil to burnish over the same turquoise pencil I used for the other two burnishing examples. You can see how it’s possible to significantly alter the colour profile with this technique.
Remember, that to get the smoothest blended effects, add more layers. I only used around four layers on my coloured squares, but I could achieve a smoother effect with more colour layers.
Burnish with grey to neutralise
Choose to apply a grey colour, or a complementary colour that has the same value (darkness) over your previous colour layers to reduce the saturation. You can create elegant and realistic effects by toning colours down.
I would advise getting a sketchbook or scrap piece of paper to experiment with colour combinations before committing to trying the burnishing technique on a drawing you’ve already spent hours on. Some colour combinations can yield unexpected results if you’re not experienced with colour mixing.
How to blend coloured pencils using Powder Blend Medium
The Brush and Pencil Powder Blend Medium is a transparent medium that is applied to the surface before the artist starts working on the drawing in the areas they want to blend. It works by preventing the pencil layer from adhering to the surface, enabling the artist to create stroke free coverage.
This pencil blend medium should be applied to a toothy surface like Pastelmat. Plus, you would need to use a fixative after completing your blended layer to hold the colours in place. After applying fixative, you should wait around two minutes for it to dry, then you can continue to work on it as normal.
How to blend coloured pencils using solvent
By adding a tiny amount of solvent to a coloured pencil layer, the binders break down, creating a thin transparent layer. Take care to only apply small amounts of solvent, with a brush, tortillion or even using a q-tip or cotton ball.
If you are using oil pencils, you can use any kind of solvent to blend colours. Solvents like mineral spirits or turpentine would work well.
With wax pencils, use a stronger solvent, such as oil of spike lavender or turpentine. Alternatively, Zest-It makes a purpose made pencil solvent that can be used with wax or oil pencil, however currently it only seems to be available in the U.K.
The appearance of pencil blended with solvent looks completely different compared to layered or burnished pencil.
Solvent thinned pencil is thin, transparent looking and can emulate the effect of an oil painting. As the binders are dissolved by the solvent, it gives the smoothest look.
If you use too much solvent, then colours can feather and edges can form around the coloured pencil.
Bear in mind too, that solvent will work on all previous layers of colour. So if you want to prevent certain layers from blending into others, you will have to use a fixative.
When using solvent, take care when handling it and ventilate your area properly. The fumes are toxic and can get quite heady.
Dry blending
Dry blending is perhaps the least effective method to achieve completely smooth results. However, if you want some pencil marks to show through but create a smokey effect, this would work. It involves using a tool such as a tortillion or piece of paper. Then rubbing it onto the surface to blend the colours together.
Now you have more of an insight into how to blend coloured pencils, give it a go! Let me know in the comments which methods you want to try.
How to blend coloured pencils: Pin it!
If you’ve found anything on this site especially useful, you can make a donation to me through PayPal. I take a lot of time to research and write each topic, making sure each tutorial is as detailed as possible and I make all my content freely available. Any small donation (even the price of a cup of coffee!) can help me to cover the running costs of the site. Any help from my readers is much appreciated :).
Follow the link in the button below to support this site.
However, if you are planning on having more than three shapes in your drawing then it will be a better idea to use a lighter color. Using a lighter color will allow you to draw more complex and detailed images. You will also be able to do more intricate drawings.